Thermography: The Big Picture gets bigger
Recent advances in IR camera technology are ... fueling another surge in thermography use.
Although the composites industry was still in its infancy in the late 1960s, it was among the earliest to recognize thermography’s potential in nondestructive testing (NDT), when the first commercial infrared (IR) cameras became available. Thermography offered the possibility of a fast, non-immersive, noncontact inspection method that provided a subsurface image of an entire area, rather than a signal trace of a single point. Early adapters soon realized that in many respects, composites and thermography were an ideal match: Compared to metals, most polymer composites have higher infrared emissivities, resulting in higher signal output, and lower thermal diffusivities, which means that heat travels more slowly, so that changing temperatures could be captured by the low frame rates of early IR cameras.
Despite its early promise, it took several decades for thermography to gain broad acceptance as a first-line inspection method for composites. Among the hurdles it had to overcome was the perception that while it could provide a “pretty picture,” image interpretation was subjective and the method was suitable only for detection of large, near-surface defects. In the past decade, that view has changed dramatically. Today, thermography is routinely used in manufacturing quality assurance and in-service inspection of composite structures, often replacing tank- or squirter-based ultrasonic systems. Recent advances in IR camera technology and the availability of small, powerful computer platforms are enabling signal processing and excitation methods that offer unprecedented range and sensitivity, fueling another surge in thermography use.
Active thermography basics
In active thermography, the surface of a part is thermally excited and its response is observed with an infrared (IR) camera. As heat flows from the part surface to its interior, obstructions, such as voids or inclusions, affect the cooling of the surface, causing transient hot or cold regions that appear in the IR image.
Simple systems use heat guns or lamps for excitation, and depend on an operator to visually evaluate the
IR cooling sequence captured by the camera. Although these can be used to detect severe in-service problems (e.g., delamination, impact damage, trapped water), they lack the sensitivity or depth range to address many of the problems that occur during manufacturing — e.g., porosity or foreign object debris (FOD). These also do not lend themselves to standardized procedures and/or automated inspection. However, modern thermography systems based on flash heating and advanced signal processing have proven to be effective solutions for composite quality assurance.
Beyond the image: Thermographic signal reconstruction
A significant turning point for thermography occurred in 2001 with the introduction of the Thermographic Signal Reconstruction (TSR) method, as emphasis shifted from visual image evaluation to independent analysis of the time history of each camera pixel.
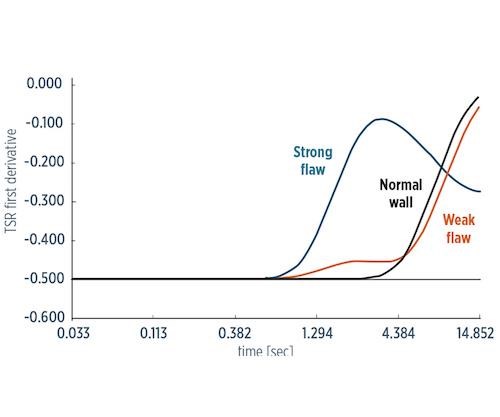
TSR enables detection of small, deep and subtle features (e.g., porosity, kissing bonds) that cannot be detected by visual evaluation of IR images. Instead, it uses robust and repeatable signals that are appro- priate for automated evaluation. Unlike conventional thermography, which was based on flaw identification in a host material, TSR-based thermographic material characterization enables measurement of the thermophysical properties of a flaw-free sample.
In a 2016 probability of detection (POD) study on flaw detection in laminate structures conducted by the US Federal Aviation Admin. (FAA) and Sandia National Laboratories (Albuquerque, NM, US), TSR-based thermography outperformed the ultrasound baseline and other thermographic and visual imaging systems (lock-in and scanning thermography and laser shearography) in all categories (flaw detection, sizing and speed).
Thermography and composites: A perfect match
Thermography normally operates in a single-side mode, does not require immersion or contact with the part under test, and can easily accommodate non-planar surfaces, allowing inspection of closed structures, uncured prepreg or components with acoustic holes that may not be appropriate for ultrasonic inspection. The improved depth range and sensitivity gained through the use of TSR has proved to be particularly significant for composites inspection, because it enables detection of “weak” thermal flaws, such as kissing bonds or porosity, which do not significantly obstruct the flow of heat to generate localized surface hot spots that are detectable using conventional thermography. However, heat flowing through such flaws is slightly delayed, and the time difference is measured by TSR to find conditions such as porosity at levels of less than 1%.
LASLAT: The bigger picture
Typical thermography systems view an area of approximately 1 ft2 while positioned in close proximity to the test part. Inspection of large structures, then, requires that the camera and the means of excitation be moved from one position to another until the entire surface has been covered. In this respect, thermography users have faced the same problem they have encountered with ultrasound and other NDT technologies: rapid coverage of an entire area required that NDT equipment be mounted on a robot, gantry or creeper. Although such systems are commonplace today, they are large, complex and costly, and installations often require infrastructure modifications. Further, the systems require reprogramming to accommodate inspection of new parts.
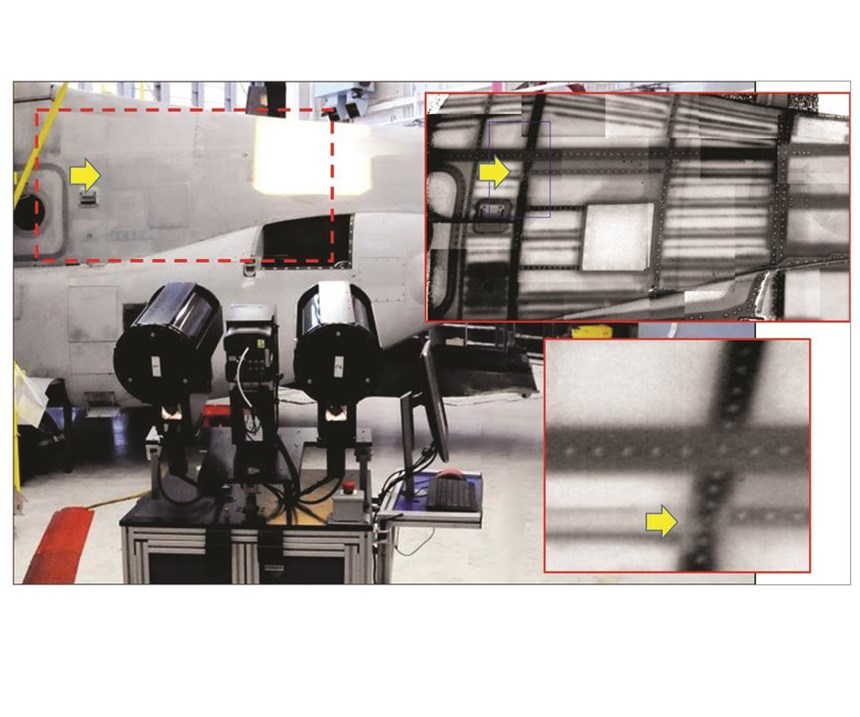
Working under a Phase II SBIR with the NAVAIR Fleet Readiness Center East in Cherry Point, NC, US, Thermal Wave Imaging (Ferndale, MI, US) recently introduced Large Standoff Large Area Thermography (LASLAT), a new approach to large-structure NDT that does not require robot or gantry mounting and can be configured to inspect a new part geometry in minutes. Combining the sensitivity gained with TSR signal processing with a novel optical projection system that excites the inspection surface from a distance, LASLAT inspects an area on the order of 300 ft (27.9m2) or 20 ft by 15 ft (6.1m by 4.6m) from a single, fixed position located 10-15 ft (3-4.6m) from the part, and it can easily be moved to different locations within the factory or hangar. The system is fully automated, so when a new scan pattern is defined, the inspection is performed without user intervention.
The result of a LASLAT inspection is a TSR subsurface image of the entire scanned area, automatically combined using MOSAIQ software. The entire inspection process is significantly faster and more efficient than conventional thermography, because the operator can evaluate results while the scan is being performed.
NAVAIR is currently evaluating the system for inspection of composite helicopter rotor blades. “Our inspection time for the V-22 blade can go almost a shift and a half, so you’re looking at 10-14 hours to do one blade,” says Clint Salter, materials engineer at the NAVAIR Fleet Readiness Center. “With the increased field of view of LASLAT, as well as the improved data analysis software, we should be able to cut that turnaround time down to five hours a blade, if not less.”
Speeding up the process: Real-time inspection arrives
Modern thermography systems that use signal processing to enhance IR camera performance are based on a four-step excite-acquire-process-analyze inspection sequence. The camera must be stationary during acquisition, and the duration of acquisition depends on the part’s thickness and its thermal properties, so there can be a considerable time interval between the start of an area’s inspection and the availability of the processed image.
LASLAT includes a new real-time mode in which data is acquired and instantly processed during the excitation period. This enables the system operator to see the resulting image and make an interpretation in real time, and the operator can stop the inspection of an area if a defect is identified.
Further, the real-time mode has been added to the handheld VoyageIR system, enabling a quick “walkaround” inspection of an aircraft, augmented by advanced signal processing to detect and identify subsurface damage. In many respects, the poten- tial for thermography that was first recognized in the s has finally come to be.
Related Content
Airborne delivers composite upper stage tank for EU ENVOL project
Nine-member consortium targets development of low-cost, green vertical orbital launcher with manufacture of an ultra-lightweight composite tank design in an automated manufacturing environment.
Read MoreOptimizing robotic winding of composite tanks and pipes
Pioneer in mandrel-based reinforced rubber and composite products, TANIQ offers TaniqWindPro software and robotic winding expertise for composite pressure vessels and more.
Read MoreBabyark launches smart, composites-intensive car seat
Impact-absorbing car seat approaches safety holistically with carbon fiber and D3O materials and embedded sensors for real-time monitoring.
Read MoreMold 3D printing helps automate composite bathtub, shower production
As part of its efforts to automate as much of its production process as it can, Lyons Industries acquired a Massivit 10000 additive manufacturing system to quickly produce high-performance molds and support fixtures.
Read MoreRead Next
“Structured air” TPS safeguards composite structures
Powered by an 85% air/15% pure polyimide aerogel, Blueshift’s novel material system protects structures during transient thermal events from -200°C to beyond 2400°C for rockets, battery boxes and more.
Read MoreDeveloping bonded composite repair for ships, offshore units
Bureau Veritas and industry partners issue guidelines and pave the way for certification via StrengthBond Offshore project.
Read MorePlant tour: Daher Shap’in TechCenter and composites production plant, Saint-Aignan-de-Grandlieu, France
Co-located R&D and production advance OOA thermosets, thermoplastics, welding, recycling and digital technologies for faster processing and certification of lighter, more sustainable composites.
Read More



.jpg;maxWidth=300;quality=90)

