Measuring ply-wise deformation during consolidation using embedded sensors
Strip-type shape sensor method claims real-time measurement of ply-wise deformation.
Share
Fig. 1. Strip-type deformation sensors. One ply of cured carbon fiber/epoxy prepreg to be monitored is used as a thin, flexible sheet with optical fibers — one embedded in the upper surface and one in the lower surface. The sensor can be embedded without changing laminate thickness by removing one ply locally and replacing it with the sensor. Photo Credit, all images: MDPI
Landscape photo: Two types of sensors with different rigidity were fabricated: a higher-stiffness 0º-sensor with carbon fibers in the sensor axis direction and a more flexible 90º-sensor with carbon fibers orthogonal to the sensor axis. Photo Credit: MDPI
When manufacturing a composite part, laminated raw materials such as carbon fiber-reinforced polymer (CFRP) prepreg change external shape during heating and forming. As temperature increases, resin viscosity decreases and voids between prepreg plies collapse under vacuum and external autoclave pressure. During this consolidation process, internal fiber orientation and alignment can be disrupted in corners and where there are gaps or overlaps in the prepreg sheets as the fiber-resin suspension flows from high-pressure areas to low-pressure areas. This consolidation continues until the prepreg laminate is cured and is an important process that determines composite quality. Until now, technology to measure the deformation occurring in each ply during this process has been unsatisfactory.
Simulation models for predicting consolidation deformation have been developed and verified by physical experiments, but such evaluations have mostly measured samples after curing and have not shown shape change progression in situ. Recent advances in X-ray computed tomography (CT) have made it possible to measure microscopic structural changes in composite materials nondestructively. However, CT experiments have typically been impractical because the equipment is expensive and proprietary, the test sample is limited to a small size (e.g., < 10 × 10 centimeters) and it is challenging to perform such measurements in a high-pressure environment like an autoclave.
Optical fibers with fiber Bragg grating sensors have shown the most promise, successfully used to evaluate the cure-induced deformation of composite materials [1]. However, the optical fiber must be adhered to the composite material by the gelled resin, and the optical fiber and the composite material must deform as one without the sensor slipping or rotating. Therefore, it has been difficult to measure consolidation deformation before resin solidification.
New sensor for in-situ consolidation monitoring
A composites research group at the University of Tokyo (Japan) recently developed a method for real-time measurement of ply-wise deformation during consolidation [2] which uses a strip-type fiber optic sensor (Fig. 1). This sensor comprises two 100-micrometer-diameter optical fibers — one embedded in the upper surface and one in the lower surface of a thin flexible sheet.
In this research, a single 150-micrometer-thick ply of cured Toray (Tokyo, Japan) T700S/2592 prepreg (Tg 115 °C) was used both for the thin, flexible sheet and the CFRP to be monitored. By removing the prepreg in the sensor area, the sensor was inserted without changing the laminate thickness, and being the same material as the laminate, the sensor was not a foreign object. [Editor note: Fiber optic sensors were laid up in a test laminate and demonstrator part as the #8 tow in a Coriolis Composites AFP machine and used to monitor prepreg cure in the SuCoHS project.]
When this flexible sensor is embedded in a composite part during layup, it deforms with the surrounding plies — i.e., the sensor shape along the sensor axis and the deformation of the surrounding plies are identical. When the shape sensor is bent following the deformation of the prepreg, a strain difference is generated in the two optical fibers. This strain difference is measured by a distributed strain measurement device — in this case, the ODiSI A-50 by Luna Innovations (Roanoke, Va., U.S.) — and the shape is calculated from the strain difference obtained. The ODiSI uses swept-wavelength interferometry to measure the Rayleigh backscatter as a function of position in the optical fiber and then calculates strain from the amount of shift in the scattered light spectrum.
Because the core of conventional optical fiber strain sensors — where strain is measured — is on the neutral axis, the measured strain does not change when the embedded sensor undergoes bending deformation of the surrounding plies. The strip-type sensor described here can indeed measure the bending deformation and is fixed at the top and bottom surfaces within the prepreg ply. Thus, its stripe shape is not subject to twisting around the sensor axis and ply-wise deformation in the out-of-plane direction can be measured accurately and stably prior to resin solidification.
Such measurement can be started from the layup process. The sensor captures various important phenomena that affect the part quality, such as ply waviness during layup, wrinkle formation during pressurization, and fiber movement and resin flow during heating. The capability of the sensor is determined by the performance of the strain measurement device. The ODiSI A-50 has a spatial resolution of less than 1 millimeter, a deformation resolution on the order of micrometers and a sensor length of up to 100 meters. The measurement speed is 1 hertz or more, which enables the sensor to capture high-speed deformation phenomena. Further advances in measurement devices will enable users to capture faster deformations in smaller areas.
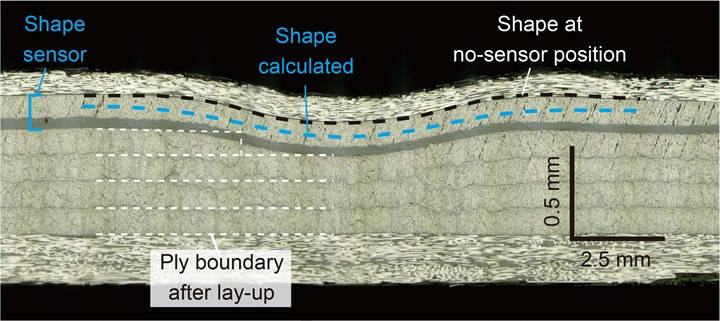
Fig. 2. Cross-sectional micrographs of gap specimen after curing. Note the photo is compressed horizontally by a factor of 5 to make deformation more clearly visible. Third layer from the top has a 5-millimeter-wide gap, and the white dashed line (left side) indicates ply boundary at time of layup. A flexible 90º-sensor was embedded in the second layer from top, and the ply’s concave shape caused by the gap was accurately calculated (blue dashed line). The proposed sensor system can capture consolidation phenomena leading up to this final deformation state.
Composite gap monitoring
Consolidation monitoring was conducted on test specimens made to represent typical gaps and overlaps in an AFP laminate. Toray T700S/2592 prepreg was hand laid with the stacking sequence [02/902]S and a 5-millimeter-wide gap and lap on one ply of the 90° layer just below the upper 0° layer.
Strip-type sensors were fabricated by placing two optical fibers 2 millimeters apart on the upper and lower surfaces of one ply of the uncured prepreg and curing in an autoclave with metal caul plates. The cured sheet was then cut into 6-millimeter-wide sensor strips. Two sensors were made to evaluate the influence of sensor rigidity — a stiff 0-sensor with carbon fibers in the sensor axis direction and a flexible 90-sensor with carbon fibers orthogonal to the sensor axis. Each type of sensor was placed in two 6-millimeter-wide sections removed from one ply of 0° prepreg directly above the gap/lap. The entire test specimen was then vacuum bagged and cured in an autoclave.
Fig. 2 shows the cross-sectional micrograph of the gap at the 90-sensor position after cure. To make the deformation more visible, the micrograph was compressed horizontally by a factor of 5. The third layer from the top had a 5-millimeter-wide gap (white dashed lines on the left side), resulting in a concave surface after cure. The shape obtained by the sensor (blue dashed line) and the deformation at the gap section agreed well, confirming the high sensitivity and accuracy of the proposed sensor system. Furthermore, the overall deformation induced was the same as in the area where the sensor was not embedded (black dashed line), confirming that the consolidation deformation was not disturbed by the sensor.
Note, this is simply a comparison of the sensor response and the specimen cross-sectional shape after cure. The shape sensor can capture the consolidation phenomena leading up to this final deformation state. In fact, the concave shape in the gap section did not monotonically deepen during the curing process, but instead — once deepened by autoclave pressurization and heating — it then relaxed by the flow of the resin and splaying of the fiber at the gap edges to reach its final shape. Check reference 2 below for more details.
Based on the deformation history measured using this embedded strip sensor method, the manufacturing process can be optimized to obtain the desired shape after curing. For example, the strength of compaction during lamination or the timing to increase autoclave pressure can be adjusted to suppress fiber waviness. Temperature hold time or the rate of temperature increase also can be modified to facilitate the relaxation of undesired deformations.
Future composite parts
This new shape sensor enables in-situ observation of the previously uncapturable consolidation deformation [3]. At this time, the technology demonstration is limited to thermoset composites cured in autoclaves, but expansion to a wider range of processes, including thermoplastic composites and welding processes, will be addressed in the near future.
The information provided by the sensors is expected to have a wide range of applications such as material characterization, process optimization, product quality assurance, validation of simulation models and construction of digital twins. As reported in CW, the development of sensing technology for composite materials has been remarkable in recent years (see “Discover More About Sensors for Composites Processing”). Within composite parts being produced today, as yet unknown deformation phenomena may be waiting to be measured by these advanced sensor technologies.
References
1Minakuchi, S. (2015). “In situ characterization of direction-dependent cure-induced shrinkage in thermoset composite laminates with fiber-optic sensors embedded in through-thickness and in-plane directions.” Journal of Composite Materials, 49(9), 1021-1034.
2Minakuchi, S., Niwa, S., & Takeda, N. (2022). “Strip-Type Embeddable Shape Sensor Based on Fiber Optics for In Situ Composite Consolidation Monitoring.” Sensors, 22 (17), 6604.
3Tamagawa, T., Minakuchi, S., Niwa, S. & Takeda, N. (2023). “Consolidation deformation of composite corner depending on compression force during layup: In situ monitoring using fiber-optic-based embeddable shape sensor.” Composites Part A: Applied Science and Manufacturing, 165, 107371.
About the Author
Shu Minakuchi
Dr. Shu Minakuchi is currently associate professor at The University of Tokyo (Japan). He obtained his PhD from the university in 2008. He has been working on fiber-optic-based in-situ monitoring and modeling of composites for more than 15 years.
Related Content
3D-printed CFRP tools for serial production of composite landing flaps
GKN Aerospace Munich and CEAD develop printed tooling with short and continuous fiber that reduces cost and increases sustainability for composites production.
Read MorePlant tour: BeSpline/Addcomp, Sherbrooke, QC, Canada
Composites automation specialist increases access to next-gen technologies, including novel AFP systems and unique 3D parts using adaptive molds.
Read MoreATLAM combines composite tape laying, large-scale thermoplastic 3D printing in one printhead
CEAD, GKN Aerospace Deutschland and TU Munich enable additive manufacturing of large composite tools and parts with low CTE and high mechanical properties.
Read MoreAutomated robotic NDT enhances capabilities for composites
Kineco Kaman Composites India uses a bespoke Fill Accubot ultrasonic testing system to boost inspection efficiency and productivity.
Read MoreRead Next
Sensors for Composites Processing: CW Trending Episode 8
Why use sensors in composites manufacturing? What sensor types are available and how can they be applied? Learn about all of this and more in a discussion with CW senior editor Ginger Gardiner and editor-in-chief Jeff Sloan in this episode of CW Trending, sponsored by RVmagnetics.
Read MoreContactless measurement of temperature, pressure in composites
Magnetic microwires enable contactless measurement of temperature and pressure during cure and in service.
Read MoreVIDEO: High-volume processing for fiberglass components
Cannon Ergos, a company specializing in high-ton presses and equipment for composites fabrication and plastics processing, displayed automotive and industrial components at CAMX 2024.
Read More


