Fiber-optic sensors shed light on the toughest composite design challenges
Designers of composites are learning that if they are to be able to guarantee component and system performance, repeatability and reliability, it is critical that they have access to more sensor and test data.
Designers of composites are learning that if they are to be able to guarantee component and system performance, repeatability and reliability, it is critical that they have access to more sensor and test data. Whether they are striving to certify a complex structural component, validate the structural integrity of a part over its entire lifecycle or simply assess the performance of an adhesive bond, designers now have a new measurement tool that provides unprecedented visibility into the structural behavior of composite components.
For decades, the go-to device for materials engineers and stress analysts was the metal foil strain gage. Invented in the 1950s, the foil strain gage quickly became the standard tool for spot measurement of strain levels in metals. However, due to the cost and complexity of applying foil gages (gage size, attachment and bonding, wiring, etc.), stress analysts were forced to focus on the most critical locations and select only a handful of key stress points to instrument with gages. In an era dominated by standardized isotropic materials, such as metal, with well-understood properties and knowledge of how stress propagates through the material, this approach of using relatively sparse test data was an efficient and effective way to test materials and validate the accuracy of high-fidelity models.
The current state of composite materials and systems, however, is another story. In addition to their orthotropic properties, composites encompass a vast and growing range of material types and manufacturing. Although the models and simulation software available for composite materials are advancing at an impressive rate, the number of variables and complexity inherent in composite materials and systems remains a significant challenge for the designer looking to guarantee the performance and reliability of a new design. As carbon fiber composites are more frequently used in structural applications, requiring higher levels of verification and certification, spot checking with strain gages leads to problematic blind spots.
Fortunately, the gap between reality and simulation can be greatly reduced with fiber-optic sensors. Pioneered in the 1990s for monitoring civil structures, fiber-optic sensing has developed, evolved and matured to a level of capability and robustness useful in the composites industry, enabling much more complete and accurate testing and verification. In fact, the technology promises to move beyond the test lab because it is proving useful in building smart parts that incorporate thousands of integrated sensors.
High-definition fiber-optic sensing
These developments are a direct result of the advent of high-definition fiber-optic sensing (HD-FOS). HD-FOS can use a standard optical fiber as a very sensitive, continuous sensor of strain or temperature. By exploiting the minute effects that strain and temperature have on how light travels through that optical fiber, HD-FOS systems are able to detect and measure more than 1,000 discrete points of strain or temperature per meter of the fiber length, with accuracy and sensitivity on par with legacy sensors, including strain gages.
Moreover, optical fibers are physically compatible with composite materials. Extremely lightweight, small and flexible, optical fiber sensors can easily be installed on composite parts regardless of geometry. They even can be embedded within a part and measure internal or interlaminar strain — loads that are invisible to strain-gage or vision-based systems. Multiple studies have shown that embedding fiber-optic sensors into a composite structure has no detrimental effect on the structure’s performance. Additionally, unlike metal-foil strain gages, fiber-optic sensors are passive, immune to electrical fields, chemically inert, and exhibit excellent fatigue performance.
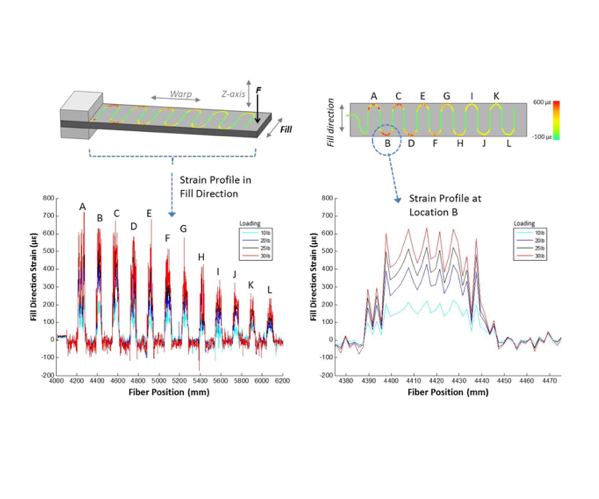
For example, Fig. 1 illustrates a composite cantilever beam with three-dimensional carbon fiber reinforcement. A 125-µm optical fiber was integrated into the preform fabric along the x (warp), y (fill) and z axes. These HD-FOS sensors are, therefore, able to capture thousands of discrete strain locations in all three dimensions. The figure includes a sample of the measured strain data along the y-axis, which is transverse to the applied strain. However, the labeled points where the fiber makes a turn (A, B, C, etc.) experienced tensile strain that increased with load; those data are also mapped onto the beam for easier visualization.
Multi-material joints and adhesive bonds
One particularly challenging area where this type of high-density measurement data can make a difference is the use of adhesively bonded interfaces, particularly for mixed materials. Although adhesive bonds have many significant advantages, mechanical fasteners remain a requirement in many applications because it is a challenge to certify adhesive bonds due to their unpredictable performance and durability.
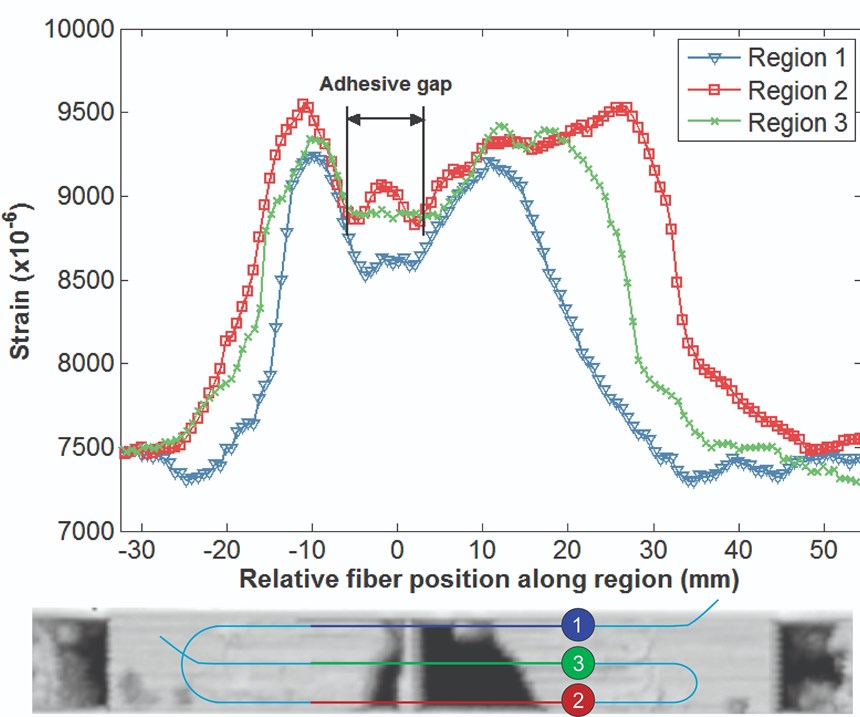
Conventional nondestructive evaluation or test (NDE/NDT) methods can be used to inspect bonds, and to some extent, quantify damage or disbonding. But HD-FOS is proving to be a valuable tool to measure residual strain directly, along or within the bond lines, to verify the integrity of the bond and to provide detailed insight into disbond growth. Fig. 2 shows measurement data from an HD-FOS bonded to both sides of a Center Cut Plies (CCP) test specimen, which is about 30 cm long. After a fatigue test, the CCP was ultrasonically scanned, and the C-scan was compared to the HD-FOS data. The HD-FOS data are able to more precisely pinpoint the locations of the disbond tips, allowing the calculation of disbond growth rate. Continuous strain along identified sections 1, 2 and 3, at a single moment in time, is displayed along with the C-scan inspection.
Smart parts for damage detection
Although gaining insight into these complex material systems and building more accurate damage and fatigue models are important, the holy grail may be the ability to monitor the performance of the material, bond or system during operation. Currently, a variety of NDE/NDT methods are typically used to detect flaws or damage. However, these methods are time-consuming and require significant downtime and labor costs. The ability to use onboard sensors to provide in-situ health monitoring or instant detection of structural issues is the promise of structural health monitoring (SHM) and damage detection technologies.
Consider a composite structure that has lightweight and unobtrusive fiber-optic sensors embedded throughout its geometry during fabrication. At any time, a snapshot of the stress and strains throughout the structure can be taken to provide an assessment of residual strain, which research has shown to be a reliable indicator of fatigue damage, impact damage, crack growth, disbonding, delamination or general damage.
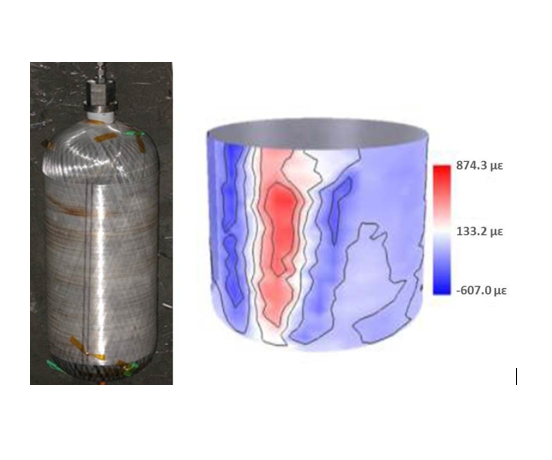
Fig. 3, for example, shows a composite overwrapped pressure vessel (COPV) with multiple meters of fiber-optic sensors woven into its overwrapping. A quick interrogation of the embedded HD-FOS sensors generates thousands of residual strain measurements over the entire surface, which is mapped onto the 3D model of the COPV. This vessel had previously been drop tested and the 3D data map easily identifies areas of sustained internal damage, indicated by the red areas.
The ability to embed these HD-FOS sensors into materials, components, bonds and systems can potentially change the way composite parts and structures are designed and managed through their lifecycles. HD-FOS sensors are starting to enable truly smart parts and smart structures that are enhanced with a “nervous system” of sensors able to detect and analyze internal stresses, deformation and movement while in operation. In the meantime, the same sensor technology is already providing unprecedented visibility into the performance of new materials, processes and designs.
About the Author
David Potter is director of marketing for Luna Innovations (Blacksburg, VA, US), a manufacturer of fiber-optic sensing systems. He holds a BSEE from Vanderbilt University and an MSEE from M.I.T. He has more than 25 years of experience in the testing and measurement industry, developing and managing products and solutions for data acquisition, industrial measurements and control. He is responsible for product management and strategic marketing at Luna.
Related Content
Heat-activated foaming core rapidly achieves net-shape 3D parts
CAMX 2024: L&L Products exhibits its InsituCore foaming core structural technology, which can be used to create foam core composites minus machining or presses, as well as the Phaster A K-700, a rapid-cure adhesive.
Read MorePittsburgh engineers receive $259K DARPA award for mussel-inspired underwater adhesion
The proposed META GLUE takes inspiration from hydrogels, liquid crystal elastomers and mussels’ natural bioadhesives to develop highly architected synthetic systems.
Read MorePark Aerospace launches aerospace, MRO structural film adhesive
Aeroadhere FAE-350-1 is a curing epoxy formulation designed for composite, metal, honeycomb and hybrid applications.
Read MoreBiDebA project supports bio-based adhesives development for composites
Five European project partners are to engineer novel bio-based adhesives, derived from renewable resources, to facilitate composites debonding, circularity in transportation markets.
Read MoreRead Next
“Structured air” TPS safeguards composite structures
Powered by an 85% air/15% pure polyimide aerogel, Blueshift’s novel material system protects structures during transient thermal events from -200°C to beyond 2400°C for rockets, battery boxes and more.
Read MorePlant tour: Daher Shap’in TechCenter and composites production plant, Saint-Aignan-de-Grandlieu, France
Co-located R&D and production advance OOA thermosets, thermoplastics, welding, recycling and digital technologies for faster processing and certification of lighter, more sustainable composites.
Read MoreDeveloping bonded composite repair for ships, offshore units
Bureau Veritas and industry partners issue guidelines and pave the way for certification via StrengthBond Offshore project.
Read More
