Taking Subjectivity out of Class A Surface Evaluation
Toward the goal of more consistent, repeatable and quantifiable Class A surface analysis, automakers and systems suppliers are developing and employing automated surface inspection tools.
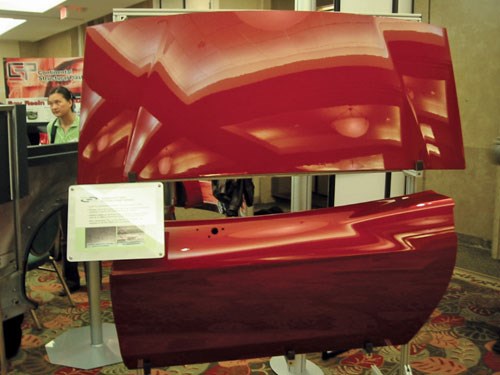
In the increasingly competitive automotive industry, a consumer's first impression in a dealer showroom can make all the difference in a sale. Not only does the design have to be appealing and functional, but the Class A surface finish on the car's, SUV's or truck's painted body panels must be flawless and harmonious — no matter what material lies underneath the painted surface. In today's tough economic climate, especially, there is little room for imperfection.
Class A surfaces can be more difficult for the composites molder to achieve because the dual nature of the materials introduces a much larger number of variables into the product than do monomaterials, such as steel or aluminum. The reinforcement fiber that makes the material a great choice because it offers a stiffness-to-weight ratio superior to that of steel and aluminum also can read through to the surface, creating a visible pattern that is unacceptable in a Class A finish. Currently, the most widely used composite for Class A surfaces is sheet molding compound (SMC), a compression moldable blend of polyester or vinyl ester resins, chopped glass fiber and mineral filler (although carbon fiber is finding some applications in low-volume luxury vehicles). Here, the SMC resin formulation has presented some much chronicled difficulties in powder priming operations, when moisture outgassing from the SMC has created surface defects, making recent production of Class A SMC body panels highly problematic (see the sidebar entitled "SMC: Overcoming Powder Prime" at the bottom of this page).
One of the positive results of the struggle to improve SMC formulations used in Class A body panels is the awareness today within the auto industry of the need to bring greater objectivity to Class A surface quality inspection.
Given the importance attached to Class A finishes, what's surprising is the degree to which Class A inspection remains a subjective discipline. There is no single, overarching standard Class A specification. Instead, each OEM sets its own standard for what is and is not acceptable in a Class A surface. "Overall, Class A standards are pretty consistent from company to company, although more expensive luxury vehicles demand higher quality and a more consistent finish," explains Tom Pilette, VP, product and process development for automotive systems integrator Decoma International of America (Troy, Mich.). In the automotive industry, an A surface is a surface a consumer can see without functioning the vehicle (e.g., opening the hood or decklid), while a Class A surface finish generally refers to painted body panels and specifically to the distinctness of image (DOI) and gloss level on the part.
Typically, surface quality is measured visually by human observation of reflected images on the material surface, viewed under controlled lighting conditions. In a Class A surface, the curvature of the surface is designed to be continuous in each direction, meaning that each point along a common line should have the same radius of curvature. (Class A parts can have textured finishes; they are designed with curvature and tangency alignment to near perfect reflection quality.)
Operators, generally craftsmen with a high level of training and experience, look for distortion of the regular light pattern in the reflected image to identify potential defects. Operators visually monitor and maintain a wide range of surface appearance characteristics, including not only overall surface quality, but color accuracy and color matching (part-to-part, batch to batch), and how tight and consistent margins are, part to part.
"Class A specifications have tightened in the last 5 to 10 years," Pilette contends, noting that "our customers are competing in vehicle segments they've never competed in before, against competitors they've never competed against before."
Yet, even in the face of such stiff competition and extreme surface requirements, automakers and their Tier 1 suppliers rely primarily on the subjectivity of the human eye for quality control of Class A surfaces. "We do use some instrumentation in quality checks, but at the end of the day, defects on Class A surfaces are subjective," says David Dyke, director, advanced engineering, Meridian Automotive Systems (Allen Park, Mich.). "Ultimately," he concludes, "it's a jury evaluation."
As Class A surface finish standards become more stringent, some question whether the subjective approach taken by human inspectors can compete with objective surface inspection systems that offer consistent, repeatable and quantifiable evaluations of painted automotive bodies.
Aiding Human Perception
A variety of testing equipment is available to aid in quantifying particular aspects of surface appearance. Ashland Performance Materials (Dublin, Ohio) has developed the Ashland Laser Surface Analyzer (ALSA) — a replacement for the company's earlier Laser Optical Reflected Image Analyzer (LORIA). The ALSA measures surface waviness, orange peel, and DOI using a diode laser and charge-coupled device (CCD) to capture part surface data. Similar measurements can be obtained using tools available from BYK-Gardner GmbH (Columbia, Md. and Geretsried, Germany). The company offers a line of measurement instruments built around its wave-scan technology, which analyzes the short-term waviness of a surface and then reports the amount of waviness as a function of wavelength.
Devices such as these each measure specific surface qualities, explains Kedzie Davis Fernholz, a research engineer with the Materials Research and Advanced Engineering division of Ford Motor Co. (Dearborn, Mich.) "However, to my knowledge, there isn't one piece of equipment that quantifies all aspects of surface appearance." In many cases, operators still rely on boundary samples, which exemplify the minimally acceptable quality for the part at a particular process stage. "We have boundary samples for molding, priming and painting," says Dyke. "If the operators have any questions regarding the quality of a surface, they compare it to the boundary sample to deem whether the part is acceptable or not acceptable."
The boundary sample, however, does not eliminate the subjectivity in a system that relies on human perception. "Even if you have a boundary sample, there still can be disagreement about whether something falls within the limitations of the boundary sample or not, as each individual will perceive defects differently," says Fernholz. "An objective system provides one expert opinion that everyone can agree upon." The human factor involved when boundary samples are used effectively eliminates consistency in surface evaluation and makes repeatability impossible.
An Objective Approach to Larger Defects
Fernholz is currently leading a project focused on identifying bondline read through, which she hopes will be more broadly applicable to eliminating some, if not all, of the subjectivity in evaluation of a Class A surface for defects with a signature larger than that of orange peel, texturing or paint pops. The work is a joint effort between members of the Automotive Composites Consortium Joint Working Group — Ford, General Motors Corp. (Warren, Mich.), and Chrysler LLC (Auburn Hills, Mich.) — and two measurement technology developers, Visuol Technologies (Metz, France) and EOS Technologies (Auburn Hills, Mich.).
"The defects that we're trying to measure currently are limited to those with a signature similar to bondline read through," notes Fernholz, but adds that the technology is applicable to any aspect of surface evaluation. "The methodology for quantifying defects should be the same for any type of defect, but the filtering scheme, thresholds, and characteristics used to quantify the severity of the defect may differ."
"It's a very difficult problem to tackle," she adds. "There is a lot of equipment out there that provides great images, but the problem lies in extracting useful numerical data that allows the severity of defects to be quantified and correlated to the visual defect."
The system is based on Visuol's Ondulo technology, which relies on the principle of deflectometry — the evaluation of the distortion of a reflection on a surface to determine the distortion in the surface itself. The Ondulo system uses a high-resolution digital camera to record the reflection of a structured light pattern off the surface. The light surface is phase shifted and a series of images is captured, allowing quantification of a surface's local curvature variation — the most relevant criterion for surface appearance analysis, according to Fernholz. This data can be used to determine whether there are discontinuities in the surface that could be perceived as a rejectable defect.
In the end, numerical data enables consistent and repeatable evaluation and faster and more accurate process corrections when a defect is detected. "Trying to determine if a process change is making an issue better or worse is highly dependent on the perception of the person evaluating the part, the angle at which the part is being observed, and the lighting in the evaluation area," explains Fernholz. "However, an objective system produces data that shows how the defect has changed over time."
Automated Surface Evaluation Proves Value
In the upper-class and premium car market segments, competitors differentiate themselves, in part, based on the quality of the painted car body. This need for perfection is driving the development and implementation of fully automatic surface finish inspection systems. Recently, both BMW and Mercedes Benz worked with inspection technology providers to develop viable systems for their production plants.
At the Mercedes Benz factory in Rastatt, Germany, a robot-based Car Paint Vision (CPV) system from ISRA Surface Vision (Darmstadt, Germany and Duluth, Ga.) is inspecting A- and B-class parts. The system is designed to identify a wide variety of defects, including orange peel, color defects, dust infusion and more. Defect recognition based on ISRA Surface Vision's Multiscan Defect Fusion technology is reportedly 99.7 percent accurate. Image acquisition is launched every 30 mm/1.18 inches. At each interval, one main image is captured along with four secondary images.
To prove the system, 200 car bodies were inspected at the Mercedes Benz plant, and the results, according to ISRA Surface Vision, were better than those achieved with the naked human eye. As a result of the system's accuracy, Mercedes Benz has been able to cut back on the number of human operators required on the production line for surface defect detection, and the early detection of paint surface defects has reportedly reduced the number of rejected vehicles.
BMW also is working toward a fully automated whole car body inspection system, teaming with sensor system company Micro-Epsilon (Ortenburg, Germany and Raleigh, N.C.) to develop and test a system based on the company's reflectControl deflectometry system. Similar to Visuol's Ondulo system, deflectometry is used to detect flaws (such as dents, bulges, and other surface defects as small as 0.5 mm/0.02 inches) in the reflected surface. Two trial runs were conducted at BMW's Dingolfing, Germany plant. Currently, BMW is evaluating the installation of a complete four-robot-arm detection system capable of inspecting complete car bodies across two vehicle assembly lines. Complete car bodies reportedly can be inspected in less than 90 seconds.
Although deflectometry and wave-scan technology are not materials-specific by design, they may hold the greatest potential for composites manufacturers, especially those involved in competitive environments, such as automotive, aerospace and consumer products. The curvature and surface appearance of composites parts, in particular, can be affected by a variety of manufacturing factors, including material type, stacking sequence, cure process and tool quality. Regardless of part size or shape, inspection technologies can be used to measure and scan tool surfaces and part surfaces of various materials — SMC, BMC, glass or carbon prepreg. Many, including the bondline read-through system being developed by Ford and wave-scan technology, can be used to measure raw, primed and painted parts.
Composites manufacturers who invest in surface quality measurement technology, therefore, can better position themselves and their products for success. "As automotive companies get smaller, design and release engineers are more likely to choose materials in which they have high confidence. The more closely molders can match the appearance of steel, the more likely it is that program teams will be open to specifying composites in place of steel," says Fernholz. "In the end, it's critical to remove the barriers that can get in the way of choosing composites, and these types of automated inspection systems can add a level of confidence and improve surface appearance consistency."
Related Content
Composite molding compound replaces Invar for lightweight small satellite structures
Patz Materials and Technologies and Lawrence Livermore National Laboratory developed a new monolithic optics housing with 80% less weight, near-zero CTE and the high-volume manufacturing required for commercial space.
Read MorePEEK vs. PEKK vs. PAEK and continuous compression molding
Suppliers of thermoplastics and carbon fiber chime in regarding PEEK vs. PEKK, and now PAEK, as well as in-situ consolidation — the supply chain for thermoplastic tape composites continues to evolve.
Read MorePlant tour: Arris Composites, Berkeley, Calif., U.S.
The creator of Additive Molding is leveraging automation and thermoplastics to provide high-volume, high-quality, sustainable composites manufacturing services.
Read MoreActive core molding: A new way to make composite parts
Koridion expandable material is combined with induction-heated molds to make high-quality, complex-shaped parts in minutes with 40% less material and 90% less energy, unlocking new possibilities in design and production.
Read MoreRead Next
“Structured air” TPS safeguards composite structures
Powered by an 85% air/15% pure polyimide aerogel, Blueshift’s novel material system protects structures during transient thermal events from -200°C to beyond 2400°C for rockets, battery boxes and more.
Read MoreDeveloping bonded composite repair for ships, offshore units
Bureau Veritas and industry partners issue guidelines and pave the way for certification via StrengthBond Offshore project.
Read More


