Share
Read Next
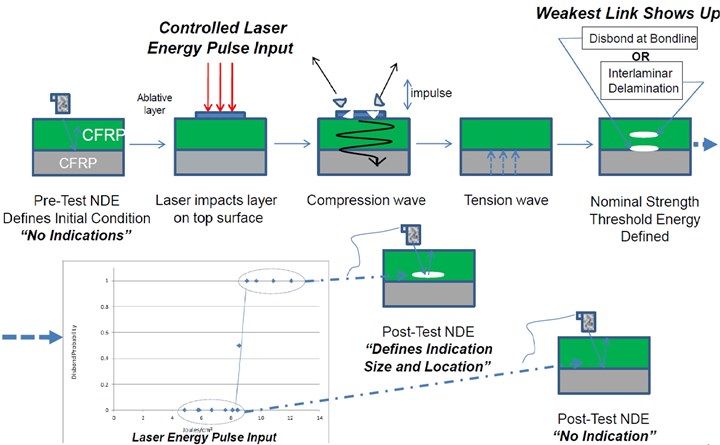
This schematic shows the laser bondline inspection (LBI) process. It uses a controlled laser pulse to transmit a compression wave perpendicularly into a bondline between two composite structures. The compression wave passes through the bondline and is then reflected back as a tension wave. The tension wave breaks weak bonds but leaves nominal bonds unaffected. Pre- and post-process NDI confirms the presence or absence of broken bonds. Photo Credit, all images: Boeing and AFRL
Editor’s note: This article has been reviewed and approved by the U.S. Air Force Research Laboratory (AFRL) per case number AFRL-2022-0209.
Use of adhesive bonding to assemble composite structures is not new. It’s been widely used in every major end market the composites industry serves, ranging from automotive and marine to wind and defense. In high-performance applications like aerostructures, however, use of unitized, integrated structures has been limited by lack of confidence in the quality of adhesively bonded joints.
Further, although robust non-destructive inspection (NDI) technologies are available to verify flight-critical composites structures for certification, traditional NDI technologies are incapable of characterizing bond strength, which limits the acceptance of bonded joints in aerostructures. As a consequence, mechanical fasteners have remained the standard-bearer when it comes to reliably joining parts and providing damage arrestment.
The next generation of aircraft, however, likely will make greater use of bonding to create unitized, integrated composite structures to help reduce costs and facilitate composites structure fabrication to meet higher production rate targets. Expanded use of bonding will require deployment of a reliable, fast, NDI or verification process to substantiate the strength quality — or lack thereof — of an adhesive bondline. That technology, in development for the last two decades, has arrived in the form of laser bondline inspection (LBI).
How LBI works
LBI is the brainchild of Dr. Richard Bossi, a now-retired senior technical fellow in NDI at Boeing (Seattle, Wash., U.S.). Marc Piehl, also a now-retired technical fellow in structures technology at Boeing, worked on LBI and says the technology was first proposed by Bossi more than 20 years ago. Initial R&D work on LBI at Boeing identified a need for a laser technology that did not yet exist at the aircraft manufacturer. This led Boeing, in 2001, to LSP Technologies (LSPT, Dublin, Ohio, U.S.), a laser peening specialist, which used a Small Business Innovation Research (SBIR) grant to help Boeing mature LBI to a technology readiness level (TRL) and manufacturing readiness level (MRL) sufficient for commercialization. Boeing and LSPT were granted a patent for the technology in 2009; LSPT was granted a second patent in 2010.
What Bossi, Piehl, Boeing and LSPT developed is innovative and creative, but not so terribly complex or difficult to understand. Basically, LBI uses laser-created stress waves to proof test a bondline in tension, breaking those that are unacceptably weak, thereby rendering them visible to conventional post-LBI NDI systems. In greater detail, LBI uses controlled, high-intensity compression waves formed by a pulsed laser excitation aimed perpendicularly at an adhesive bondline. The energy is delivered by the laser in a spot size of roughly 8-10 millimeters; it is absorbed in a sacrificial overlay such as black tape or an ablative layer. Vaporization of some elements of the overlay produces a rapidly expanding plasma that is confined by water to create a compression wave that travels through the bondline and reflects off of the free surface or back wall behind the bondline. After reflection, the energy passes back through the bondline as a tension wave and stresses it, breaking weak bonds. The laser energy is tuned at a desired level to inspect for these weak bonds, but nominal strength (i.e., properly prepared) bonds remain unaffected by the tension wave. Using traditional NDI, conducted after LBI, the bond failure of weaker than anticipated joints is definitively ascertained.
For technology maturation, Boeing prepared and submitted several SBIR Topics that funded LSPT to develop the prototype LBI system. Next came a series of U.S. Department of Defense ManTech programs with the Air Force Research Laboratory (AFRL, Wright-Patterson Air Force Base, Ohio, U.S.). AFRL’s lead on LBI started with Rick Hall and then transitioned to materials engineer Kara Storage, who worked closely with Bossi, Piehl and LSPT to develop first a lab-scale LBI system, and then a full-scale prototype system. David Lahrman, VP of business development at LSPT, says the company completed the first prototype LBI system in 2010. Boeing acquired a copy of the first prototype LBI system from LSPT in 2011; a second LBI system was subsequently acquired by Northrop Grumman (El Segundo, Calif., U.S.), which has conducted its own LBI research with AFRL in research programs separate from Boeing’s.
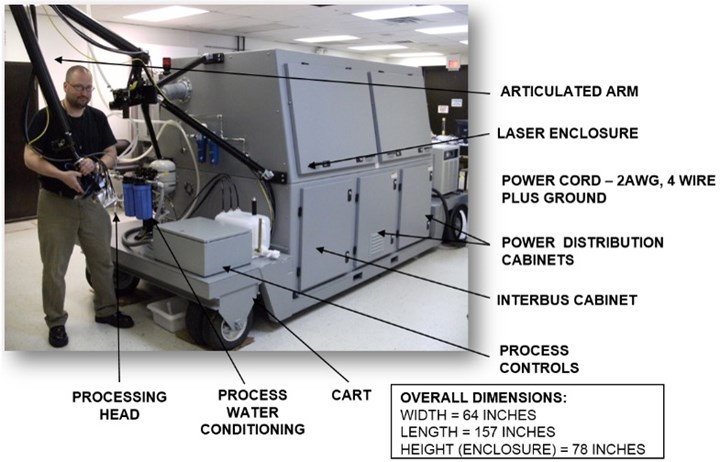
This is the prototype LBI system developed by LSP Technologies (LSPT). AFRL is working with LSPT and Boeing to mature some of the hardware on this system to reduce the size of the inspection head and extend the reach of the articulated arm.
The LBI system itself consists of a laser inspection head and process water conditioner attached to the end of an articulated arm affixed to the end of a large, wheeled, mobile cart that houses the laser, power distribution systems, process controls and other equipment. The cart measures 1.6 meters wide x 4 meters long x 2 meters tall. In operation, the LBI system is designed to be wheeled — typically via forklift — to the structure being inspected, where the articulating arm and laser processing head can be extended away from the cabinet and toward the work area.
Developing, testing LBI
One of the inherent challenges of LBI, and the focus of most of the development work done to mature the technology, lies in the fact that the laser, if not calibrated properly, can produce a wave form of strength sufficient to break even nominal bonds. Thus, laser calibration, adjusted for adhesive type, laminate thickness, bondline thickness, composite material type and geometry, is critical to verify that the system does not inadvertently break strong bonds or fail to break weak bonds. Developing design models, or design curves, to accommodate such variables has been the focus of most of the LBI research and development (R&D) conducted over the last several years.
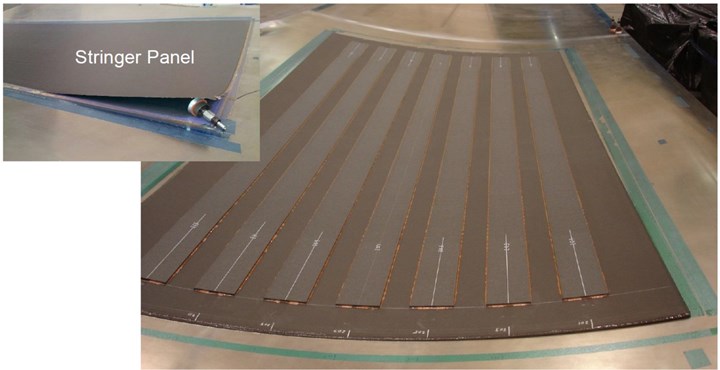
Boeing and AFRL’s research to assess and develop design curves for LBI included fabrication of a demonstrator wing panel that included a skin and bonded stringers. LBI was tested to ascertain its ability to identify weak bonds. Subsequent research also evaluated laser fluence levels with a variety of laminate thicknesses, bond type and geometries.
Piehl and Storage led this effort at Boeing and AFRL, with additional but separate research work done by a team at Northrop Grumman. Much of the work done by Boeing and AFRL is summarized in an August 2019 paper presented at the 22nd International Conference on Composite Materials (ICCM22) in Melbourne, Australia, titled “Validation of Laser Bond Inspection (LBI) Technology.” It was authored by Storage and Andrea Helbach at AFRL, and Piehl and Alan Stewart at Boeing.
The paper describes the LBI process, as well as the NDI data resulting from a series of testing and analysis performed by AFRL and Boeing on flat panels and, eventually, aircraft-sized configured joint structures, including two demonstration articles that simulated wing skins with seven bonded stringer sections attached with varying bond quality.
A major focus of the work revolves around tests on these articles — flat panels and demonstrators — to determine the threshold level or breaking strength of a variety of bond types over a range of LBI fluence levels, or laser energy levels per laser spot size area. Data were compared to mechanical test data to verify LBI’s ability to sufficiently identify weak and strong bondlines.
The ultimate goal was to identify a fluence level sufficient to prove a bond’s strength without damaging acceptable bonds (i.e., an inspection level). Results of these tests were then used to build a series of design curves/models for the deployment of LBI in real-world applications. Such models account for laminate material type, geometry, adhesive type, distance to bondline and other factors. AFRL and Boeing have, to date, conducted more than 14,000 LBI tests, which represents about 95% of the planned testing regime. The balance of tests remaining will be performed on large-scale demonstration articles.
Not surprisingly, Piehl says, thicker laminates and bondlines require higher laser energy pulses, while thinner bondlines and structures require less. Further, he notes that every composite/bondline material and process (M&P) combination produces a certain amount of “noise” that can interfere with the LBI process and produce signal loss. Research into studying such signal loss and how it impacts LBI performance is the subject of continuing research. Finally, and most notably, the research found examples of bonds in stringer/skin interfaces that passed NDI inspection but were deemed weak by LBI. “Parts passed NDI (showing good bond quality), but when tested/inspected with LBI, we found them to be much weaker than expected,” Storage notes. “That’s a powerful tool.”
Piehl also notes that the critical benefit provided by LBI is that it measures bondline strength, and strength data are very difficult to come by in a manufacturing environment using the NDI systems typically deployed in aerospace fabrication. “At an industry level, LBI is a game-changer in that it allows you to understand the strength of the structure,” he says. “It allows you to interrogate the strength of the part without damaging it. Our current non-destructive inspection methods do not detect strength.”
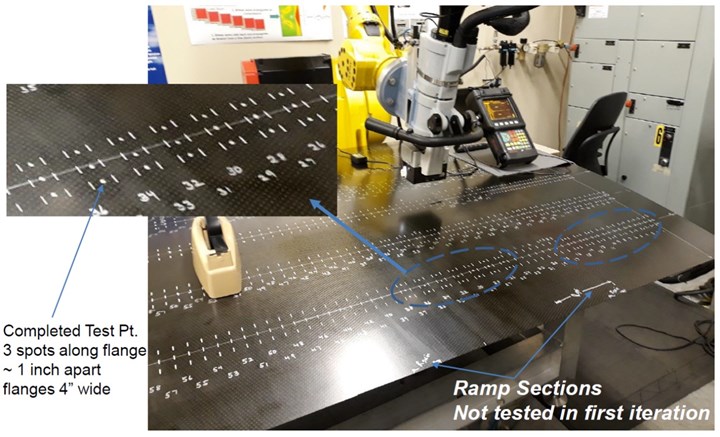
The LBI inspection head is shown here over the test panel. The system pulses an 8-10-millimeter-diameter laser beam through the laminate and through the bondline. The indication marks on the panel are used to show scanning locations.
Another focus of LBI research has been development of a gated NDI technique for the pre- and post-LBI scans. The key, says Piehl, is to develop standards, or “gates,” around NDI signal loss thresholds for determining bondline failure. Says Piehl: “Having a gated approach — meaning it’s been accepted by all parties involved — is important because if you’re doing LBI, there is no room for subjectivity. You have to have a process and you have to have a method to control.”
Real-world LBI application
Storage and Piehl report that LBI has been matured to a TRL of 6-7 and that it can and should be considered right now for use in a production environment. Piehl notes that Boeing has invested heavily in proving the viability of LBI and has developed significant intellectual property around the technology. He also emphasizes that Boeing is eager to share some of its LBI research results in an effort to expand its use and, in the process, benefit the wider composites fabrication community.
“When you step back and look at LBI,” he says, “it’s truly the Holy Grail of bonding because once you bond things together, you are relying on process control to ensure a good bond. That’s how we developed all of our certifications, and then we use damage arrestment on top of that, to show that we can stop any damage that occurs. So, LBI is the ultimate in process control because it proof tests parts at the end of the process and picks up problems immediately. It gives us a leg up on increasing the design space and increasing the reliability of bonded structures as we move forward.”
He says that the LBI design curve data produced by Boeing and AFRL is publicly and readily available and could be considered for use in a military or commercial composite bonding application, or even a repair environment. “This technology could be used on a structure that could be certified today,” Piehl says. “There’s no question about it. It could be utilized in any of the next-generation vehicles [aircraft] coming out.”
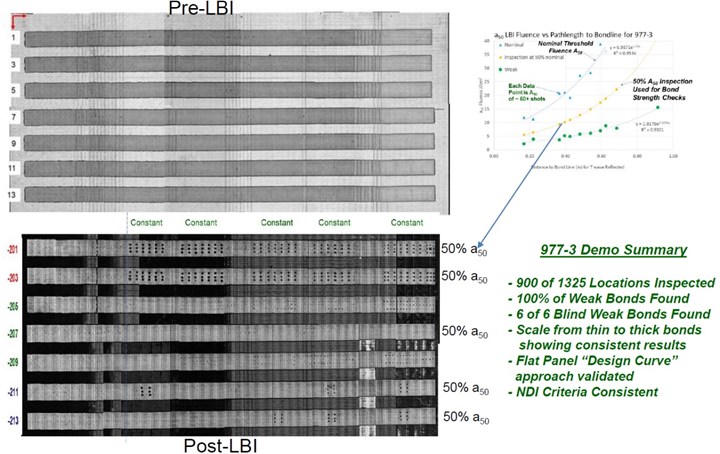
The top image here shows NDI results on the demonstration panel pre-LBI process. The bottom image shows NDI results on the demonstration panel post-LBI process. Results showed that LBI identified 100% of the weak bonds in the structure. It also found six of six “blind” weak bonds. LBI’s ability to identify weak bonds and verify nominal bond strength makes it unique as a process control verification tool. Photo Credit: AFRL
Storage says the U.S. Air Force is currently considering use of LBI in a production environment, and the U.S. Navy has shown interest as well. “I would say the time is now for LBI,” Storage says. “This is the opportunity for LBI to make the leap and be used in a production environment. This will give manufacturers the confidence — especially in highly critical areas — that you have a good bond.”
On the MRL side, Piehl and Storage note that the prototype LSPT LBI system manufactured is an early-stage design and has some limitations that can and will be addressed as the equipment is evolved. The biggest limitation is the size of the LBI inspection head, which restricts where and how it can be deployed. LSPT's Lahrman says a smaller inspection head to inspect a greater percentage of the bonded structure is being developed with SBIR funds. Another constraint is the reach of the articulated arm that delivers the laser beam to the inspection head. That is being addressed with fiber optics, which will be used to transmit the laser energy to the inspection head, replacing the mirror-based articulated arm system in the prototype. Storage also says that LSPT is looking to transfer some technologies from its laser-peening systems to the next generation LBI system.
“Can this equipment be more robust, more reliable?” Piehl asks. “Yes, that process is underway, to increase the manufacturing readiness level of the equipment such that it can be used every day in a variety of applications.” Lahrman says LSPT is in the process of securing funding to help the company develop a next-generation system, which should be available by mid-2025.
There are also limits to the type of composite material architecture compatible with LBI. For example, honeycomb structures are difficult to inspect — the core-to-facesheet interface is not inspectable. However, composite structures bonded to the facesheet of a honeycomb structure is inspectable. Hybrid structures (metal-to-composite) with access only from the metallic side, and metal-to-metal inspection, have not yet been fully evaluated and should be the subject of additional research.
Most importantly, says Storage, further research is required to assess calibration data against pre- and post-NDI results, and then integrate that calibration data into the software used to control the system. She also says AFRL and Boeing have been in contact with certification authorities regarding LBI, preparatory to application of the technology in a production environment. “We have had engagements with our certification authorities along the way just to show them where we’re at and to address any questions or concerns they have,” Storage says.
Piehl and Storage are adamant that LBI does not enable elimination of mechanical fasteners — traditional damage arrestment — in structural composite assembly. Both note that there likely will always be applications where use of mechanical fasteners is a more effective or more efficient option. LBI does, however, offer a proven and reliable tool that gives airframers and OEMs the assurance they need to confidently expand use of integrated bonded structures.
“Just because we have LBI doesn’t mean we abandon an arrestment approach,” Piehl says, “but it may allow us to increase the use of bonded joining technologies. Damage arrestment is still an industry standard for certification of joint structures. We will never get away from that. But we can use LBI to increase the design space of joining techniques where arrestment features are harder or more difficult to impart — it could definitely be used in those arenas in next-gen structures.” In addition, it may increase the time between NDI inspection intervals (i.e., the time between regularly-scheduled, required inspections).
Finally, Piehl points to one particular strength of LBI that he does not want overlooked: “LBI, as we have discussed, is a workable solution for finding weak bonds. And not only that, but we have found them 100% of the time on some very large structures. When you understand the nominal capability of the bonded structure and how LBI can deliver, it’s a big deal. There is a level of reliability here that just can’t be beat.”
Storage of AFRL says Boeing in general, and Bossi and Piehl in particular, deserve the bulk of the credit for making LBI a reality, but also noted critical participation from other companies and organizations in addition to LSPT and Northrop Grumman, including Texas Research Institute-Austin (Austin, Texas, U.S.), Southwest Research Institute (San Antonio, Texas, U.S.) and Lockheed Martin (Bethesda, Md., U.S.).
Related Content
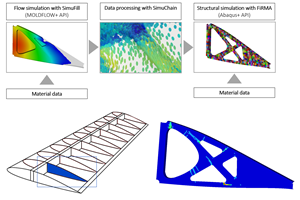
Improving carbon fiber SMC simulation for aerospace parts
Simutence and Engenuity demonstrate a virtual process chain enabling evaluation of process-induced fiber orientations for improved structural simulation and failure load prediction of a composite wing rib.
Read MoreAutomated robotic NDT enhances capabilities for composites
Kineco Kaman Composites India uses a bespoke Fill Accubot ultrasonic testing system to boost inspection efficiency and productivity.
Read MorePlant tour: BeSpline/Addcomp, Sherbrooke, QC, Canada
Composites automation specialist increases access to next-gen technologies, including novel AFP systems and unique 3D parts using adaptive molds.
Read MoreATLAM combines composite tape laying, large-scale thermoplastic 3D printing in one printhead
CEAD, GKN Aerospace Deutschland and TU Munich enable additive manufacturing of large composite tools and parts with low CTE and high mechanical properties.
Read MoreRead Next
Plant tour: Daher Shap’in TechCenter and composites production plant, Saint-Aignan-de-Grandlieu, France
Co-located R&D and production advance OOA thermosets, thermoplastics, welding, recycling and digital technologies for faster processing and certification of lighter, more sustainable composites.
Read MoreVIDEO: High-volume processing for fiberglass components
Cannon Ergos, a company specializing in high-ton presses and equipment for composites fabrication and plastics processing, displayed automotive and industrial components at CAMX 2024.
Read MoreAll-recycled, needle-punched nonwoven CFRP slashes carbon footprint of Formula 2 seat
Dallara and Tenowo collaborate to produce a race-ready Formula 2 seat using recycled carbon fiber, reducing CO2 emissions by 97.5% compared to virgin materials.
Read More


