The evolution of the modified D 695 compression test method
HPC's Testing Tech columnist Dr. Donald F. Adams,the president of Wyoming Test Fixtures Inc. (Salt Lake City, Utah), looks at the long metals-to-plastics-to-composites history of this well-used and much modified compression test method.
ASTM D 6951, “Compressive Properties of Rigid Plastics,” defines the end-loading compression test method familiar to the composites community. It was introduced by ASTM Committee D20-Plastics more than 70 years ago but was not the first method developed in this area.
In the 1930s, the aircraft industry was beginning to use aluminum, particularly in sheet form, for wing, fuselage and empennage skins. Airframers needed a method for directly determining the compressive properties, particularly the compressive strength, of these thin materials. Extensive research during the 1930s and through World War II resulted in a number of published studies. The earliest approach (U.S. National Bureau of Standards, 1933) was to clamp 20 or more thin specimens together for testing, avoiding the need for lateral restraint against gross buckling. Known as the “pack” method, it was shown to produce compressive strengths comparable to tests of thick materials2. However, it was tedious and expensive because of the number of specimens required.
W.P. Montgomery (Vought-Sikorsky Aircraft Corp., Stamford, Conn.) is credited with the first scheme for testing a single thin sheet3. R.L. Templin’s4 work followed, resulting in the Montgomery-Templin method.5 Its fixture supported each side of the 67-mm/2.64-inch long specimen with 25 steel rollers (each 2.93 mm/0.093 inch in diameter) spaced 2.54 mm/0.10 inch on center. Each roller was supported by an individual brass leaf spring on each end, so each roller could move independently. This roller spacing was calculated to prevent local buckling between rollers for aluminum specimens as thin as 0.5 mm/0.020 inch.
Although the Montgomery-Templin fixture produced strength and stiffness values comparable to those obtained by the “pack” method or by testing thick specimens, its 50 rollers and 100 springs made it expensive to fabricate and difficult to adjust. Therefore, other methods were investigated. Some used multiple steel balls to support the specimen faces, or lubricated and unlubricated solid support surfaces of steel, brass and even wood. Others employed grooved steel or brass plates — the grooves that contacted the opposite faces of the specimen were either aligned or staggered relative to each other. These methods were satisfactory as long as the coefficient of friction between the specimen and the supports was low and the clamping force was limited to that necessary to prevent buckling. The more promising and popular of these methods were incorporated into an existing standard, ASTM E 95, “Compression Testing of Metallic Materials at Room Temperature.”
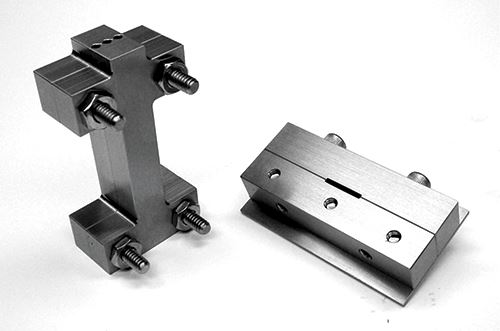
As plastics came into use, a similar need to compression test them in thin sheet form prompted adoption of the metals testing technology — specifically, grooved, aligned lateral supports were incorporated into ASTM D 695. A dogboned test specimen 3⅛ inches long was selected (7.94 cm/3.13 inch in the current standard). The increased cross-sectional area of the dog-boned ends reduces the likelihood of local buckling and/or end crushing. The lateral supports are 73 mm/2.875 inches long, allowing about 6.4 mm/0.255 inch maximum specimen deformation when loaded in compression. These supports are 11.1 mm/0.438 inch wide over the central 38.1-mm/1.50-inch length, with projections that have holes on each end so they can be bolted together to provide the desired clamping force (see Fig. 1). With the projections added, the lateral supports assume an I-shape. That shape (rather than the rectangular plate used in metals testing) and its central portion, narrower than the 12.7-mm/0.50-inch wide specimen, permit attachment of an extensometer to the specimen edge for strain measurement. ASTM D 695 hasn’t changed in 70 years.
When a method was required for compression testing thin composites, ASTM D 695 was used in the late 1970s by The Boeing Co. (Seattle, Wash.) and others. A base was added to hold the lateral supports vertically in the testing machine and a tabbed, straight-sided specimen was used. Boeing specified a specimen length of 3.13 to 3.18 inches (79.5 mm to 80.7 mm). (It’s unclear why a length range was specified.) SACMA (Suppliers of Advanced Composite Materials Assn.) later adopted this method as SACMA Recommended Method SRM 1-88 in 1988, with a specimen length of 3.18 inches, arbitrarily 0.05 inch/1.27 mm longer than the ASTM D 695 specimen. Although the lateral support length was reduced to 2.75 inches/69.9 mm (0.125-inch/3.175-mm shorter than ASTM D 695), SACMA’s 1994 revision, SRM 1R-94, adopted ASTM D 695’s 2.875 inches/73 mm.
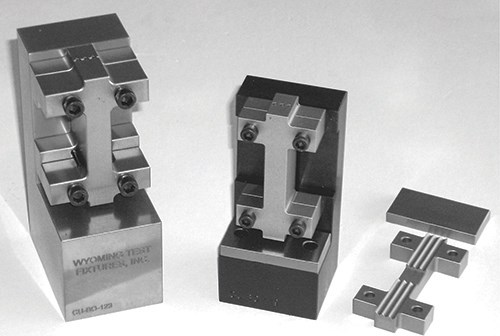
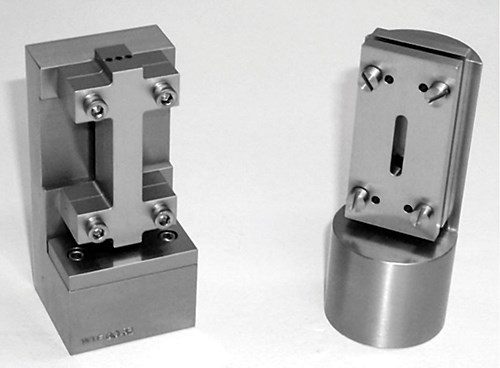
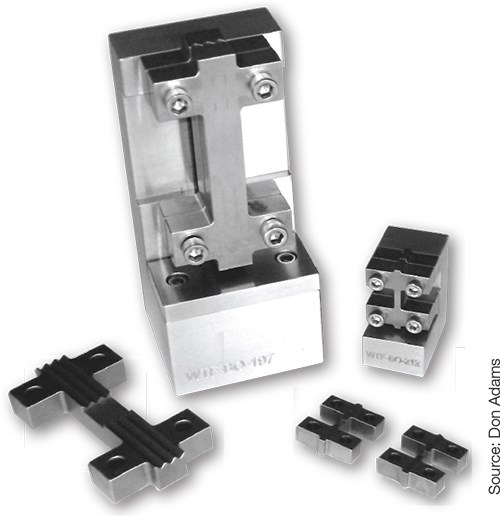
In early 1992, ASTM Committee D30-Composites drafted a new standard, based on SACMA’s SRM 1-88 document, but it was not released. Sicne SACMA disbanded in 2000, the “Modified D 695” compression test method has been homeless and somewhat unguided. As a result, a number of modified methods are in use, each with slightly different specifications. However, they all end-load a tabbed, straight-sided specimen. (See examples in Figs. 1-4.)
References
1ASTM D 695-10 (2010), “Standard Test Method for Compressive Properties of Rigid Plastics,” ASTM International, W. Conshohocken, Pa. (introduced in 1942).
2Aitchison, C.S., and Tuckerman, L.B., “The Pack Method for Compressive Tests of Thin Specimens of Materials Used in Thin-Wall Structures,” Report No. 649, National Advisory Committee for Aeronautics (NACA), Washington, D.C., 1939.
3Paul, D.A., Howell, F.M., and Grieshaber, H.E., “Comparison of Stress-Strain Curves Obtained by Single-Thickness and Pack Methods,” NACA Technical Note No. 819, NACA, Washington, D.C., prepared by Aluminum Company of America, August 1941.
4Templin, R.L., “Discussion on Single-Strip Compression Test for Sheet Materials,” Proceedings, ASTM, Vol. 45, 1945, pp. 690-93.
5ASTM E 9-09 (2009), Standard Test Methods of Compression Testing of Metallic Materials at Room Temperature,” ASTM International, W. Conshohocken, Pa. (introduced in 1924).
Related Content
Plant tour: Joby Aviation, Marina, Calif., U.S.
As the advanced air mobility market begins to take shape, market leader Joby Aviation works to industrialize composites manufacturing for its first-generation, composites-intensive, all-electric air taxi.
Read MorePlant tour: Albany Engineered Composites, Rochester, N.H., U.S.
Efficient, high-quality, well-controlled composites manufacturing at volume is the mantra for this 3D weaving specialist.
Read MoreManufacturing the MFFD thermoplastic composite fuselage
Demonstrator’s upper, lower shells and assembly prove materials and new processes for lighter, cheaper and more sustainable high-rate future aircraft.
Read MorePlant tour: Middle River Aerostructure Systems, Baltimore, Md., U.S.
The historic Martin Aircraft factory is advancing digitized automation for more sustainable production of composite aerostructures.
Read MoreRead Next
VIDEO: High-volume processing for fiberglass components
Cannon Ergos, a company specializing in high-ton presses and equipment for composites fabrication and plastics processing, displayed automotive and industrial components at CAMX 2024.
Read MoreDeveloping bonded composite repair for ships, offshore units
Bureau Veritas and industry partners issue guidelines and pave the way for certification via StrengthBond Offshore project.
Read More“Structured air” TPS safeguards composite structures
Powered by an 85% air/15% pure polyimide aerogel, Blueshift’s novel material system protects structures during transient thermal events from -200°C to beyond 2400°C for rockets, battery boxes and more.
Read More
