A comparison of shear test methods
Dr. Don Adams compares the shear test methods that are currently available to the composite industry.
In my July 2005 column, a new ASTM standard shear test method was introduced1. At that time, I raised the question, Why do we need another shear test method for composite materials?, with the promise of a discussion to come later. Later has come.
It should be noted, first, that there has been a greater variety of shear test methods developed and used during the past 40 years than for any other type of mechanical test of composites, including tension and compression, the two other basic tests.
One reason for so many attempts is the difficulty in obtaining a reasonably pure and uniform shear stress state in the test specimen, which is critical if true shear properties are to be measured. Another problem is that some test methods adequately determine shear strength but not shear modulus, while the reverse is true for other methods. And while there are three independent shear strength/shear modulus properties for an orthotropic material, most shear test methods permit the determination of only one or two.
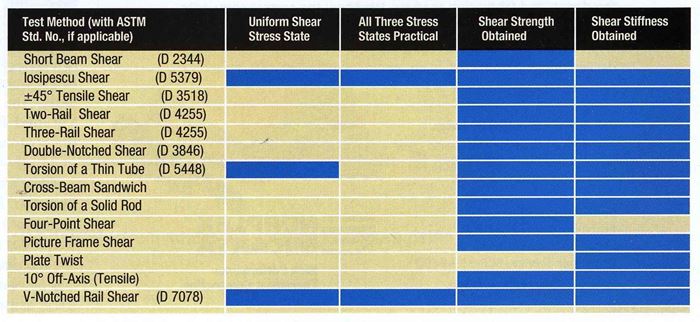
Even a brief search of the published literature will uncover a dozen or more different shear test methods in current (if not common) use. These shear tests are reviewed in a number of publications (see my references2-7). A few of the more popular methods, in approximately decreasing order of frequency of current use, are listed in the accompanying table. It is interesting that all of the more popular methods are ASTM standards. (The new V-Notched Rail Shear test method is listed last, since it has just been introduced and usage frequency has not yet been established.)
A quick scan of the accompanying table indicates why the Iosipescu Shear test method has become so popular in the relatively few years since its introduction in 1993; it reasonably satisfies all of the criteria defined in the table. The potential of the V-Notched Rail Shear test is correspondingly obvious. Unlike the two- and three-rail shear test methods, it also introduces a reasonably pure shear stress state, and is capable of evaluating all three shear stress states. It should be noted that the first capability is critical, and the second can be important in certain applications.
However, the table is obviously not totally definitive, as the Short Beam Shear test ranks first in frequency of use even though it received only one positive mark. Its popularity is due to the simplicity of the test specimen and test fixture, the ease with which the specimen can be prepared and the test can be conducted, and the method’s generally low cost. These nontechnical factors often become dominant influences when a test method is being evaluated for selection. Short Beam Shear is an excellent materials screening and quality control test, particularly if a unidirectional composite can be tested. Though this method obtains neither a pure nor uniform shear stress state, the test is nonetheless a good indicator of the quality of the fiber-matrix interfacial bond, and hence the quality of the composite8. Although the four-point shear test9 has, in theory, some technical advantages relative to the three-point Short-Beam Shear test, these advantages have not been demonstrated in practice8.
The ±45° Tensile Shear test is also popular for primarily nontechnical reasons. A simple uniaxial tensile test, the method requires no special fixturing. And since the tensile strength of an angle-ply laminate is typically not high, a simple straight-sided, untabbed specimen can be used. This simplicity makes it a popular shear test method. Unfortunately, since the stress state in the specimen is complex, it is not a reliable quantitative test4,6,7. And since the Short Beam Shear test requires a much smaller specimen and is even simpler to conduct, the ±45° Tensile Shear test is not the preferred screening or quality control test either.
Double-Notched Shear is another test method whose primary virtue is ease of use and certainly is not the quality of the results obtained. The straight-sided specimen contains half-depth, flat-bottomed notches on opposing surfaces. The notches are staggered so that a shear plane between the notches is created when an axial tensile or compressive force is applied to the specimen. However, severe stress concentrations are induced by the notches, rendering the shear strength results questionable6,10.
Many shear test method survey papers written over the years have started with the statement, “Torsion of a Thin-Walled Tube is the ideal shear test method, but ….” Then all of the reasons why it is not more commonly used are given. As noted in the above table, the virtue of this test method is that a reasonably pure and uniform shear stress state is obtained. Although the magnitude of the shear strain in a circular tube varies linearly from the axis of twist, the variation across the thin tube wall is small. Since composite tubes are typically filament wound and a unidirectional composite is the most desirable specimen, a hoop-wound tube is the logical configuration. But hoop-wound tubes are typically very weak in bending. Thus, if the torsional loading axis is not well-aligned, the induced bending moment can cause premature failure and thus inaccurate shear strength results. As secondary considerations, thin-walled tubes are not always representative of the usage form of the material being evaluated, and gripping them requires special procedures.
Interestingly, axially-reinforced unidirectional composite Solid Rods Loaded in Torsion mitigate many of the problems of testing thin tubes, but introduce new problems. Solid rods are easier to fabricate, and are rugged, being relatively insensitive to induced bending moments11. But the shear stress varies along the radius, nonlinearly when the rod is loaded beyond the elastic limit, making the determination of the shear strength more difficult12.
Cross-Beam Shear requires a large and expensive sandwich panel specimen2,6, and Picture Frame Shear requires a complex test fixture2,13. Nonuniformities in the stress state plague both methods. The 10° Off-Axis Test of a unidirectional composite does not exhibit a pure stress state14. Plate Twist does not provide shear strength, which limits it usefulness.
Thus, a summary of shear test methods is relatively simple. For materials screening and quality control testing, the Short Beam Shear test, in spite of all its limitations and detractors, is probably the best choice. For generating accurate shear properties design data, the Iosipescu Shear and V-Notched Rail Shear test methods are the obvious choices.
Wyoming Test Fixtures Inc.
References
1ASTM Standard D 7078-05, “Shear Properties of Composite Materials by the V-Notched Rail Shear Method,” ASTM International (W. Conshohocken, Pa.), first issued in 2005.
2Chatterjee, S.N., Adams, D.F, and Oplinger, D.W., “Test Methods for Composites: A Status Report, Volume III: Shear Test Methods,” Report DOT/FAA/CT-93/17, *III, Federal Aviation Admin. (Atlantic City, N.J.), June 1993.
3Lee, S., and Munroe, M., “Evaluation of In-Plane Shear Test Methods for Advanced Composite Materials,” Composites, Vol. 17, No. 1, Jan. 1, 1986, pp. 13-20.
4Adams, D.F., and Lewis, E.Q., “Current Status of Composite Material Shear Test Methods,” SAMPE Journal, Vol. 31, No. 6, Jan/Feb 1994, pp 32-41.
5Chiao, C.C., Moore, R.L., and Chiao, T.T., “Measurement of Shear Properties of Fibre Composites, Part 1. Evaluation of Test Methods,” Composites, Vol. 8, No. 3, July 1977, pp. 161-169.
6Herakovich, C.T., H.W. Bergner, H.W., and Bowles, D.E., “A Comparative Study of Composite Shear Specimens Using the Finite-Element Method,” Test Methods and Design Allowables for Fibrous Composites, ASTM STP 734, C.C. Chamis, editor, ASTM International, (W. Conshohocken, Pa.), 1981, pp. 129-151.
7Adams, D.F., and Lewis, E.Q., “Experimental Assessment of Four Composite Material Shear Test Methods,” Journal of Testing and Evaluation, Vol. 25, No. 2, March 1997, pp. 174-181.
8Adams, D.F., and Lewis, E.Q., “Experimental Study of Three- and Four-Point Shear Test Specimens, “Journal of Composites Technology & Research, Vol. 17, No. 4, October 1995, pp. 341-349.
9Whitney, J.M., and Browning, C.E., “On Short-Beam Shear Tests for Composite Materials,” Experimental Mechanics, September 1985, pp. 294-300.
10Markham, M.F. and Dawson, D., “Interlaminar Shear Strength of Fibre-Reinforced Composites,” Composites, Vol. 6, No. 4, July 1975, pp. 173-176.
11Adams, D.F., and Thomas, R.L., “The Solid-Rod Torsion Test for the Determination of Unidirectional Composite Shear Properties,” Textile Research Journal, Vol. 39, No. 4, April 1969, pp. 339-345.
12Chatterjee, S.N., Yen, C.F., Kessler, J.A., and Adams, D.F., ”Inelastic Shear Response of Unidirectional Composites from Torsion of Solid Bars,” Composite Materials: Testing and Design (Eleventh Volume), ASTM STP 1206, E.T. Camponeschi, Jr., editor, ASTM International (W. Conshohocken, Pa.), 1993, pp. 53-69.
13Kennedy, J.M., Barnett, T, and Farley, G.L, “Analysis of the Picture Frame In-Plane Shear Test for Composite Materials,” Proceedings of the 28th AIAA/ASME/ASCE/AHS SDM Conference, 1987, pp. 402-407.
14Chamis, C.C., and Sinclair, J.H., “10° Off-Axis Test for Intralaminar Shear Characterization of Fiber Composites,” Report TN D-8215, NASA-Lewis Research Center (Cleveland, Ohio), April 1976.
Related Content
Crashworthiness testing of composites: A building block approach, Part 2
Following the previously discussed coupon-level testing element, subcomponent and component testing are the next steps in designing crashworthy composite structures.
Read MoreTesting to support composite bolted joint analysis
An overview of ASTM Standard Guide D8509, and its coupon-level mechanical testing of design properties for analyzing composite bolted joints.
Read MoreInterlaminar tensile testing of composites: An update
New test method developments for measuring interlaminar tensile strength address difficulties associated with the ASTM D6415 curved beam flexure and ASTM D7291 flatwise tensile tests.
Read MorePhotothermal tomography for locating, quantifying defects in composites
Years of infrared testing development result in thermography technology that is no longer just qualitative, but can define defect size and depth, making additional UT scans obsolete.
Read MoreRead Next
All-recycled, needle-punched nonwoven CFRP slashes carbon footprint of Formula 2 seat
Dallara and Tenowo collaborate to produce a race-ready Formula 2 seat using recycled carbon fiber, reducing CO2 emissions by 97.5% compared to virgin materials.
Read MoreVIDEO: High-volume processing for fiberglass components
Cannon Ergos, a company specializing in high-ton presses and equipment for composites fabrication and plastics processing, displayed automotive and industrial components at CAMX 2024.
Read MoreDeveloping bonded composite repair for ships, offshore units
Bureau Veritas and industry partners issue guidelines and pave the way for certification via StrengthBond Offshore project.
Read More


