Bearing testing of composites
CW columnist Dr. Dan Adams (Wyoming Test Fixtures, Salt Lake City, UT, US) reviews the available options for testing the bearing strength of mechanically fastened composite joints.
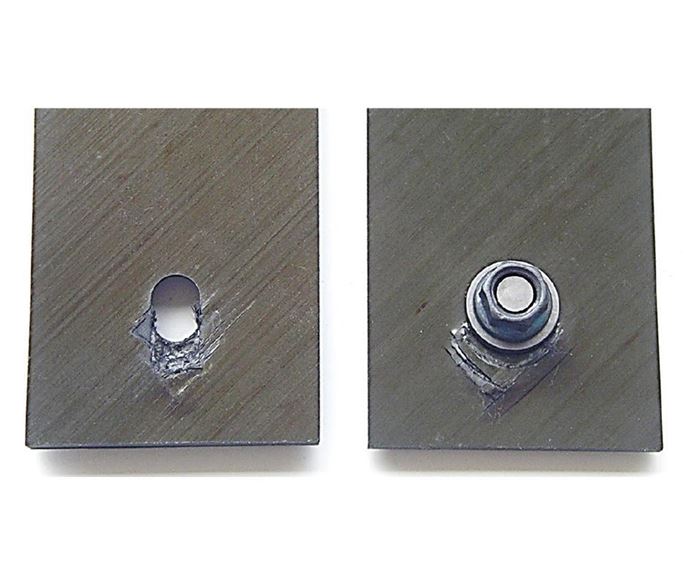
In addition to mechanical tests used to determine material properties of composite materials, tests to determine structural properties are commonly performed on multidirectional composite laminates. A subset of these are bearing tests, commonly performed to determine the bearing stress at which failure occurs in a composite laminate, or the bearing strength, of mechanically fastened composite joints. Bearing stress is defined as the applied load divided by the bearing area of the hole (hole diameter multiplied by the specimen thickness). Bearing failures typically consist of crushing of a localized region of the composite laminate that is in contact with the fastener (Fig. 1).
The bearing strength of a composite laminate depends on many factors, including the joint configuration (single or double shear), the type of fastener (pin or bolt), the number of fasteners (typically, one or two) and the specimen loading (tension or compression).
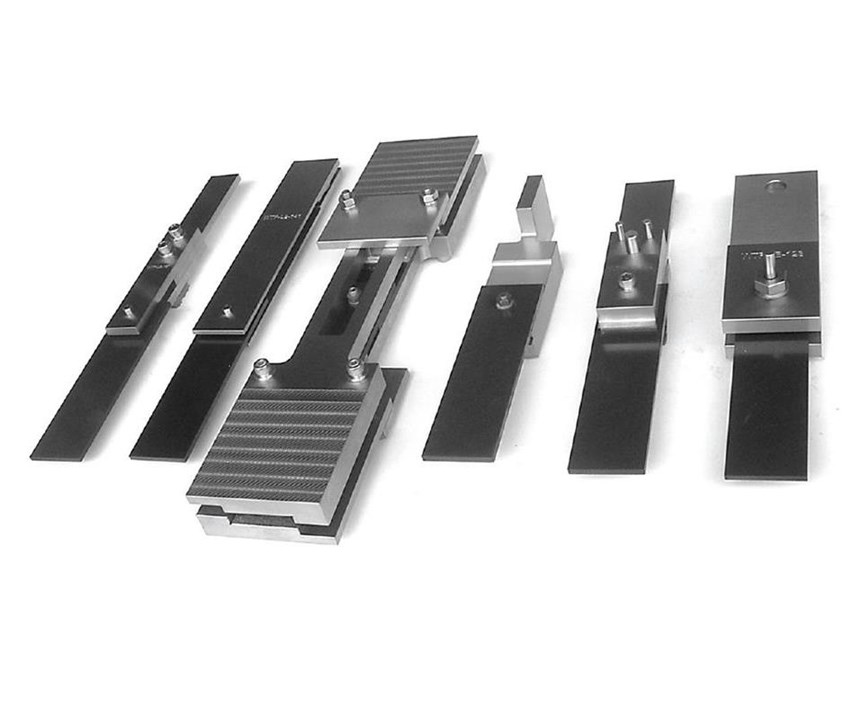
Two ASTM standards are available for bearing testing of composites. ASTM D 9531, originally developed for plastics, uses a double-shear configuration intended for use with pins. ASTM D 59612, developed specifically for polymer matrix composite laminates, includes four joint configurations, referred to as Procedures A-D. Additionally, SACMA SRM 93 uses a pin-loaded, double-shear configuration. (The fixtures for all six are pictured in Fig. 2).
Sawicki4 provides an excellent comparative evaluation of the various bearing test methods available for composites. Perhaps the most significant difference between the tests is whether the fastener(s) are loaded in single or double shear. Single-shear bearing tests are described in ASTM D 5379 Procedures B and C for two- and one-piece composite specimens, respectively. Although single-shear joint configurations are more commonly used in application, they produce an asymmetrical loading that results in bending of the composite specimen and fastener during loading. As a result, the bearing stress varies through the specimen thickness and the resulting bearing strength is reduced.
In contrast, double-shear bearing tests, described in ASTM D 953, ASTM D 5379 Procedures A and D, and SACMA SRM 9, use a one-piece composite specimen fastened between two steel components of the loading fixture. Double-shear configurations provide symmetrical loading of the fastener and a relatively uniform bearing stress distribution through the thickness of the composite laminate.
The choice between a single-shear and double-shear configuration often is made based on the intended uses of the test results. For material qualification and acceptance or as part of a material characterization program, it is desirable to have a bearing test configuration that identifies material-related effects under bearing load. For these uses, double-shear configurations are preferred, due to the more uniform bearing stress distribution. For use in structural design and analysis, the bearing test configuration typically is chosen to best represent the application of interest; thus single-shear configurations are commonly used. Regardless of the joint configuration chosen, however, the measured bearing strengths cannot be considered to be a material property, nor can the bearing strengths obtained from different joint configurations be used interchangeably.
Another important consideration in bearing test selection is the type of fastener used. The choice of pins vs. bolts can affect the resulting bearing strength due to the difference in out-of-plane restraint provided in the region of bearing failure. The through- the-thickness compression loading produced by a bolt torque can significantly increase the measured bearing strength compared to that produced using a pin. Because preloaded bolts are commonly used in actual applications, they are typically used in bearing tests conducted for structural design and analysis. The effects of fastener-specific preloading are eliminated using pinned connections, and therefore pinned bearing tests are favored for comparisons between different materials or laminates. These comparisons are particularly important because differences in bearing strength do not necessarily correlate with other laminate stiffness or strength properties. The test procedures in ASTM D 5961 may be used with either pins or bolts, but ASTM D 953 and SACMA SRM 9 are for use with pins only. In addition to the type of fastener, the amount of clearance between the fastener and the machined hole in the composite laminate also can produce significant variations in bearing strength. Thus, it is important that the holes in the composite laminate be machined accurately, without damaging the laminate.
Single- and double-fastener bearing tests are commonly used, but the latter, especially those performed using a single-shear configuration, provide the best representation of the mechanical joints typically found in composite structures. Of the test methods discussed, however, only ASTM D 5961 Procedure B (Fig. 2), includes a double-fastener configuration. In general, double-fastener testing can lead to un certainty in the bearing stress produced at each fastener hole, due to differences in clearances between the pin and hole and following the onset of damage formation.
A final difference in bearing tests is whether the load applied to the specimen is tensile or compressive. While both loadings lead to the same localized bearing stresses produced as the fastener compression loads the edge of the hole, the global stress state changes from tension to compression and the interaction between the fastener hole and the end of the specimen changes as well. Perhaps most importantly, the bending deformation produced in a single-shear configuration is more pronounced under compression loading, producing differences in the resulting bearing strength. Procedure B of ASTM D 5961 describes a support fixture (Fig. 2) that can be used to reduce the bending deformation of two-piece composite specimens loaded in single-shear. Additionally, ASTM D 5961 Procedure D describes a double-shear test configuration specifically designed for compression loading.
REFERENCES
1 ASTM D 953-10, “Bearing Strength of Plastics,” ASTM International (W. Conshohocken, PA, US), 2010 (first issued in 1948).
2 ASTM D 5961-13, “Bearing Response of Polymer Matrix Composite Laminates,” ASTM International (W. Conshohocken, PA, US), 2013 (first issued in 1996).
3 SACMA SRM 9-89, “SACMA Recommended Test Method for Bearing Strength Properties of Oriented Fiber-Resin Composites,” Suppliers of Advanced Composite Materials Assn. (Washington, DC, US) 1989.
4 Sawicki, A., “On the Proliferation of Standard Tests for Composite Bearing Strength,” Proceedings of the 19th International Conference on Composite Materials, July 28-Aug. 2, 2013, Montreal, ON, Canada.
Related Content
Plant tour: BeSpline/Addcomp, Sherbrooke, QC, Canada
Composites automation specialist increases access to next-gen technologies, including novel AFP systems and unique 3D parts using adaptive molds.
Read MoreThe basics of composite drawing interpretation
Knowing the fundamentals for reading drawings — including master ply tables, ply definition diagrams and more — lays a foundation for proper composite design evaluation.
Read MoreAutomated robotic NDT enhances capabilities for composites
Kineco Kaman Composites India uses a bespoke Fill Accubot ultrasonic testing system to boost inspection efficiency and productivity.
Read MoreCarbon fiber, bionic design achieve peak performance in race-ready production vehicle
Porsche worked with Action Composites to design and manufacture an innovative carbon fiber safety cage option to lightweight one of its series race vehicles, built in a one-shot compression molding process.
Read MoreRead Next
VIDEO: High-volume processing for fiberglass components
Cannon Ergos, a company specializing in high-ton presses and equipment for composites fabrication and plastics processing, displayed automotive and industrial components at CAMX 2024.
Read MoreDeveloping bonded composite repair for ships, offshore units
Bureau Veritas and industry partners issue guidelines and pave the way for certification via StrengthBond Offshore project.
Read More“Structured air” TPS safeguards composite structures
Powered by an 85% air/15% pure polyimide aerogel, Blueshift’s novel material system protects structures during transient thermal events from -200°C to beyond 2400°C for rockets, battery boxes and more.
Read More


