Building TRUST in bonded primary structures
A DARPA program aims for certification via Bayesian process control system for the factory floor, bounding uncertainty and predicting reliability in real-time.
Unitized, adhesively bonded composite primary structures on aircraft could offer substantial cost savings by dramatically reducing part and fastener counts, as well as time and labor for airframe fabrication and assembly. Lockheed Martin Skunk Works (Palmdale, CA, US) demonstrated the possibilities in 2009, during development of the Advanced Composite Cargo Aircraft (see “Advanced Composite Cargo Aircraft proves large structure practicality”), with a 90% part count reduction in its bonded composite fuselage and vertical tail. But redundant mechanical fastening is currently required for certification of adhesively bonded primary structures on military and commercial aircraft (see “Certification of bonded composite primary structures”).
Lockheed Martin Aeronautics Co. (LM Aero Palmdale), however, now leads the Transition Reliable Unitized STructure (TRUST) project, part of the Defense Advanced Research Projects Agency’s (DARPA, Washington, DC, US) Open Manufacturing (OM) program. An effort to reduce cost and speed delivery of high-quality parts with predictable performance for defense systems, OM seeks to do so by reducing the uncertainties that cause cost overruns and delays during development, testing and early production. The purpose of TRUST is to develop the manufacturing process control necessary for certification of unitized bonded composite primary structures without redundant fasteners. “The goal is bonded primary structure,” says Skunk Works program manager Brad Hanson, “but no one is yet confident we can eliminate bad bonds.” In response, TRUST is taking a Big Data approach, attempting to build such confidence through Bayesian process control (BPC). “The overall goal is to create a framework that captures factory-floor variability and leverages probabilistic computational tools to characterize and reduce the risk of manufacturing technologies — in this case, bonded composite structures,” says Mick Maher, DARPA program manager.
What is Bayesian process control?
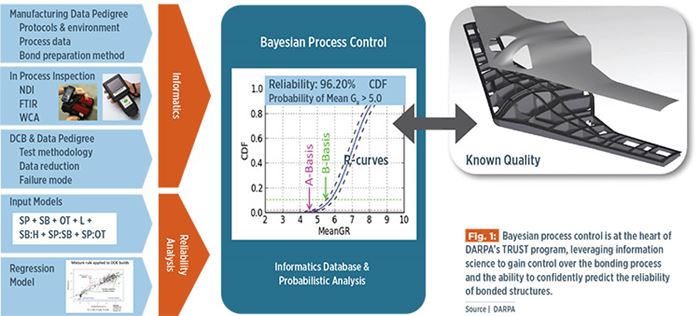
The virtue of BPC is that it avoids the incredible mathematical complexities of modeling every aspect of an extremely variable process — in this case, manufacturing bonded composites. Instead, BPC models measurable data. The basic concept is to collect data from the manufacturing floor and use it to predict the reliability of the final bonded structure. This begins through what Hanson calls an “informatics data warehouse” — essentially a state-of-the-art database that permits ready access to all data for engineering analysis. Early testing is performed to develop models that describe the bonding process variables and relate these to changes in bond performance. These models are then coupled with advanced statistical methods to characterize process variability. Such predictive models continue to mature with additional data input and reveal which process variables are critical to control. The goal is not to eradicate uncertainty but to continuously refine its boundaries until uncertainty is a quantified entity that can be addressed (see “Plasma treatment as surface preparation for adhesive bonding”).
Once models are thus refined and the BPC system is deployed to the factory, bonding process reliability is calculated based on real-time manufacturing process input. “What’s more,” says Hanson, “this Bayesian process control is a learning system, so that the more parts we build and test, the better the predictive model gets.”
Building the BPC models
To build a model that could predict how changing process variables impact the bonded structure outcome, it was necessary to design experiments that explored the possible changes in these variables. Double cantilever beam (DCB) testing is a popular method for evaluating the toughness of bonded joints. TRUST modified the method (ASTM D 5528-01) for determining opening Mode I interlaminar fracture toughness (GIc) — which classically is not bonded — so that coupons consisted of two bonded laminates with a nonadhesive insert placed between them to form an initial crack. This proved especially sensitive to bond quality resulting from the manufacturing process. However, the TRUST Phase I budget for model development was limited, so it was important to design the experiments to learn as much as possible from a small data set. To efficiently test three to five levels of seven critical bond process variables, therefore, subcontractor Southwest Research Institute (SwRI, San Antonio, TX, US) and Lockheed Martin designed several sets of experiments that would extract high-confidence data from only 100 DCB panels, each yielding six test coupons. Using this design of experiments (DOE) approach — as opposed to full factorial experiments — reduced the total number of DCB tests from 21,870 to 600.
DCB specimens comprised a “green” uncured laminate and adhesive that were co-cured to a pre-cured laminate. The laminates were made from Cytec IM7/MTM45-1 unidirectional prepreg tape and the adhesive was Cytec FM309-1 (Solvay Composite Materials, Alpharetta, Ga., U.S.). A thin insert made from fluorinated ethylene propylene (FEP) separator film was placed between the pre-cured laminate and the adhesive so that the crack initiated at the site of interest, which is that interface.
Researchers divided data collection into three rounds in order to build knowledge with each round rather than risk designing all the experiments poorly based on limited initial information. The first round was a small study of 15 panels to investigate five of the variables expected by Lockheed Martin materials and process (M&P) engineers to impact bond performance. These initial variables included surface-prep (SP, including, sandpaper grit, sanding duration), vacuum pressure during cure (V) and bond line contamination from hand lotion (L) and skin oil (SO). Test panels were built so that only one variable was modified at a time. In parallel, DOE I was developed, leveraging TRUST M&P engineers’ knowledge, to evaluate bond performance vs. four additional process variables: pre-bond temperature, (T) pre-bond humidity (H), adhesive outtime (OT) and the time between surface preparation and bonding (SB, generalized as sand-to-bond time, irrespective of whether sanding was employed). Interactions were also evaluated, such as surface-prep and adhesive outtime (SP:OT).
Testing was performed in two phases. The specimen was first “pre-cracked” by loading it at 1 mm/min until the crack extended 3-5 mm from the insert. The specimen was then unloaded. The second phase — the actual fracture-toughness test — then loaded the specimen at 5 mm/min until failure. The entire load-displacement history was recorded.
The goal for the third round of testing (DOE II) was to create a model to predict Mean GR (the average fracture toughness over the first 76.2 mm of crack length in the DCB) as a function of the manufacturing process. Statistical tools and metrics then were used to select which of the manufacturing variables described above would be included in the final BPC model. One such tool is cross-validation. This uses separate data to build a model vs. assessing its accuracy in order to avoid selecting a model that includes too many terms and becomes less predictive as a result. Stepwise regression, which starts with a single term and then incorporates additional terms one at a time, also was used to make the process of exploring different combinations of variables in the model more tractable. The final set of variables, selected because they best predicted bond reliability, is shown in the lower left of Fig. 1 (at left), titled: Input Models. But how was the model’s ability to predict Mean GR as a function of the manufacturing process evaluated? The DCB coupons provided that mechanism as well.
Bond failure analysis
By modeling each adherend of the DCB coupon analytically as a beam on an elastic foundation, the TRUST team derived a GIc that is equivalent to the ASTM D 5528 method and also predicted the instantaneous crack length from the load-displacement history that matched with measured crack lengths. This modified method greatly improves testing efficiency and eliminates subjective manual crack length measurement during testing, thus enhancing the quality of the fracture toughness data. TRUST used this test to quantify the performance of the bond, which can fail in the laminate (laminate failure, LF), in the adhesive (cohesive failure, CF), in the adhesive-substrate interface (interfacial failure, IF) or via a combination. (Note: According to adhesive bonding science, CF is the preferred failure mode.) TRUST was able to develop a critical forensic process to determine overall bond quality by relating analysis of these failure modes to the overall fracture toughness measured in the DCB testing.
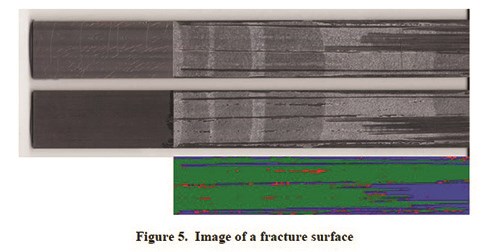
Following complete separation of the DCB coupon, photo images of the fracture surface of each DCB adherend were taken using a flatbed scanner (see Fig. 2). Matching light gray regions indicated CF, matching dark regions pointed to LF, while IF was denoted by gray adhesive on one surface and dark laminate at the mating surface. SwRI developed an algorithm and image-processing software to determine the failure mode pixel by pixel and automatically calculate the percentage of CF, IF, and LF per tested coupon. Visual inspection of multiple coupons has validated the accuracy of the SwRI tool. Because standards for bonded composite DCB testing had not previously been established, TRUST set ≤6% IF as acceptable for its purposes.
This testing also enabled a method for calculating Mean GR, which reflects fracture toughness of the entire relevant bond area (i.e., the first 76.2 mm of crack length after precrack), instead of using GIc, which describes only a single point. By combining the above image analysis with mathematical modeling of each DCB adherend, additional fracture mechanics data for the entire process was extracted. R-curves that quantified the toughness behavior throughout the fracture process were then plotted. (R is a material’s resistance to cracking, so a plot of R vs. crack extension is called a crack-resistance curve, or R-curve.) A rule of mixtures approach was then used to compare expected vs. actual fracture toughness along the coupon. Data that are essentially equivalent are not insightful, but data that differ convey which manufacturing variable causes the deviation and can be used to inform the model. Data that are worse than expected expose process parameters that need elimination. Data that are better than expected reveal parameters that need to be continued.
Bond process informatics system
With the predictive model developed and verified, the next task was to implement a bonding process data-collection protocol for use on the manufacturing floor. To that end, SwRI developed the bond process informatics system (BPIS). This prototype tool collects data from the manufacturing process, organizes it for evaluation, and applies the BPC predictive model to establish bond quality. The system enables automatic, in-process quantification of bond reliability.
To use the system, the workforce advances each part through the manufacturing process, manually entering required information into computer data-entry fields and, thus, documenting the part’s manufacturing history from material procurement to laminate fabrication, bond surface preparation, bonding, and, finally, machining and testing. The typical workflow includes more than 1,000 steps with more than 700 points at which measurements must be entered. Each bonded structure would have its own workflow, capturing key process variables for each bonded joint, including its substrate and adhesive material type, surface preparation, cure parameters, etc.
The data are then used by the BPC model to generate a reliability prediction for each composite bonded part as it is being produced. Displayed in the upper right of the data collection screen, the reliability prediction provides up-to-date feedback regarding the bond toughness throughout the process. When a new data collection job is created, the prediction displayed is based on estimated prior distributions for the key model variables. As observed data are entered for these variables, the model updates the prediction based on the new information. The reliability prediction should become more accurate as the bonded part progresses through the manufacturing process. Meanwhile, new data entered will influence prior distributions, enabling more accurate predictions on future jobs.
This prototype system gathered manufacturing data for much of the TRUST Phase I DCB coupon production and has successfully demonstrated the ability to quantify bond reliability. Further efforts will focus on decreasing data entry time and error by using automated data collection tools, such as bar codes, RFID tracking and programmed measurement-collection devices. Enabling the system for use on mobile devices could increase the immediacy and, therefore, the accuracy of manually entered data.
The BPIS’ large data repository and analysis capabilities should enable functions beyond the current reliability quantification. Hanson explains, “Bayesian process control analyzes failure so that if you’re on a path to a bad part, it can suggest how to bring that part back into control.” By recommending specific actions that will improve bond integrity, the BPIS will advance process control.
Refined bond evaluation standard
Throughout TRUST Phase I, the standard for a good bond was fracture toughness greater than 0.105 MPa-cm. This was an acceptable approach for the first phase of the project because it allowed the BPC system to evaluate bond reliability based on a simple “meets/does not meet” criteria evaluation. Early in Phase II, this admittedly too simplistic approach was refined by giving BPC the ability to consider failure modes and their impact on fracture toughness — i.e., the failed adherend image analysis and relation to R curves. This enabled a failure mode-informed regression model (FIRM), which is critical, because it prevents the BPC from mislabeling bad bonds as good and good bonds as bad. For example, if a DCB has a fracture toughness of 0.112 MPa-cm and a 35% interfacial failure (which is larger than the threshold of ≤6% IF), this should automatically be counted as a bad process and bad bond, regardless of the acceptable measured fracture toughness. Similarly, a DCB with a CF-dominated failure mode (which is preferred), but with a measured fracture toughness significantly less than the known adhesive fracture toughness, should be classified as a bad process and bad bond. The regression model, then, must be “smart” enough to recognize that a tested DCB coupon showing 100% cohesive failure and a fracture toughness 20% lower than expected, was probably affected by moisture exposure or some other unacceptable condition during processing. The SwRI-developed FIRM enables a holistic approach to evaluating good vs. bad bond processes for more accurate predictions of bond quality. The new model will be employed as TRUST Phase II continues development of composite processing parameters in DOE III, and examines the effect of contamination in DOE IV as it scales up to bonded aircraft structures.
TRUST also will investigate new, more robust surface-preparation methods (see "Plasma treatment as surface preparation for adhesive bonding") and update the BPC informatics system for, and automate its capture of, new data types. One example is the ability to detect environmental contamination by electronically collecting and comparing environmental histories for substrates and adhesives developed from workzone identifiers and barcode scans that stitch together time and temperature data for all of the constituent materials and processes.
As one of its new data types, the TRUST BPC system will begin in Phase II to account for effects of contamination on bonded structure by characterizing six shop environments at LM Aero Palmdale. Testing on a DOE IV grid using 100 DCB panels will examine the effect of contamination and also capture water contact angle measurements from BTG Labs’ (Cincinnati, OH, US) Surface Analyst. This tool and Agilent Technologies’ (Santa Clara, CA, US) hand-held Fourier Transform Infrared (FTIR) device will be characterized as inline inspection technologies for specification-compliant composite faying surfaces (see “NDI and NDT methods for process control”). Building on this research, TRUST seeks to gain statistical confidence that detrimental contaminants can be detected in the bonded unit.
Maturing process control for scalability
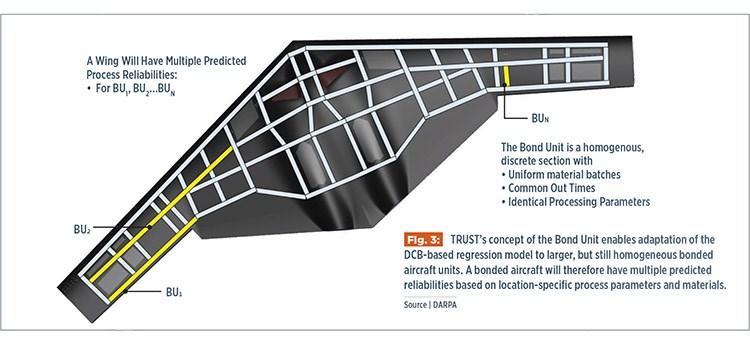
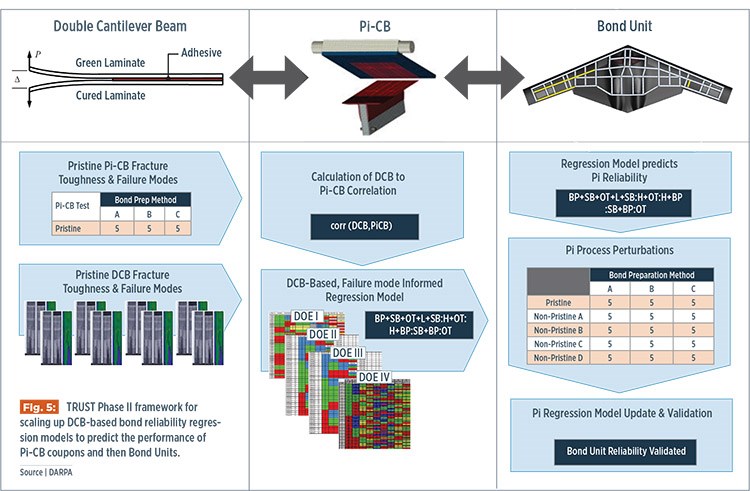
The ultimate objective of TRUST Phase II, however, is to validate the ability to quantify bonded assembly reliability. The upgraded BPIS is a key prerequisite, because it helps scale up bond process control by integrating automated data collection directly from sensors on the factory floor. This also helps to reduce testing needs when qualifying larger bonded assemblies. But there are many other issues. Because manufacturing processes and materials across an aircraft are not uniform, the TRUST team recognized that new concepts would be required to conduct spatial reliability predictions. Among Phase II’s early accomplishments was a definition for the concept of a Bond Unit (BU). Critical for the scale-up of BPC to full-size aircraft structure, the BU enables TRUST to adapt the DCB-based regression model to predict the performance of large aircraft structures.
As shown in Fig. 3, a wing comprises multiple individual BUs, each a homogeneous section of pi-joined structure (read more in “Market Trends: The Composites Affordability Initiative, Part I”). Homogeneity is defined by limiting variability in the parameters that are known to affect the quality of a bond, including material batches (i.e., one adhesive batch and one prepreg batch), a common out-time across the unit and processing parameters. When there is lack of homogeneity, by definition, the BU is split into two or more new BUs (BU1, BU2, etc.). Similar to the way the BPIS tracks differences between DCB panels and predicts the reliability of their bonds, this scaled-up BPC system will track differences between each BU and predict their reliability across the aircraft.
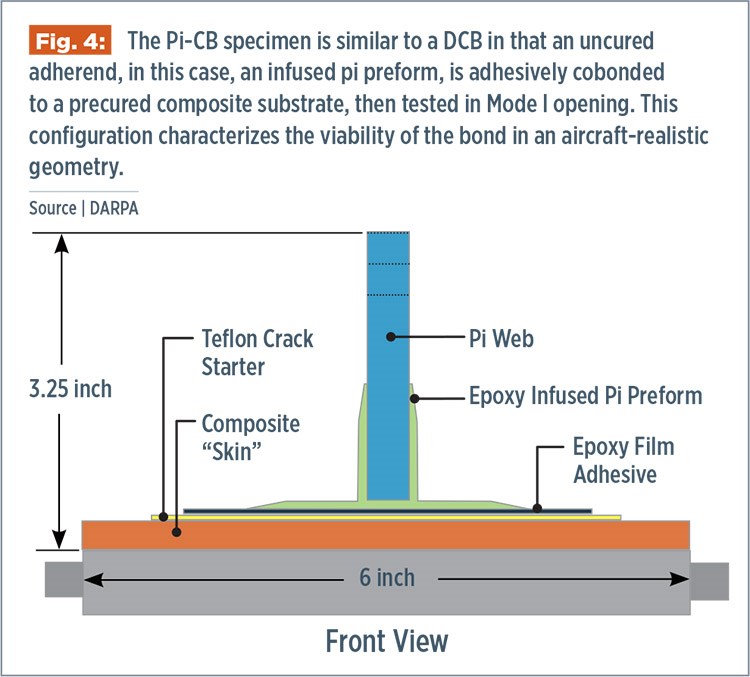
To demonstrate the scaled-up BPC system validity, LM Aero Palmdale developed the Pi-CB test (Fig. 4-5). This uses a DCB-style test specimen but replaces one monolithic adherend with a pre-impregnated pi preform, mimicking actual aircraft structural joints. Because manufacturing parameters critical to bond performance will be held constant, the Pi-CB test coupon is a suitable surrogate for an actual BU, which will validate bond performance against predictions. TRUST will generate failure-mode-informed fracture toughness for pristine Pi-CBs as a measure of bond quality and combine this data with that from pristine DCB coupons. These data sets will enable calculation of a DCB-to-Pi-CB correlation factor, which is the first step to predict BU reliability with DCB data. Combining the correlation factor with the DCB-based FIRM will enable the generation of a regression model for pi joint reliability. This regression model will be built upon by testing another set of Pi-CB coupons whose pi-specific process parameters (e.g., pi resin content) are varied. These test data will further inform the pi regression model, at which point the model will be used to predict and validate BU performance.
TRUST has made huge progress in tackling the uncertainty that has plagued bonded composite structures for decades. “Once we have process control for the whole bonded structure in hand and vetted, I expect the TRUST framework to be standard practice for bonded structures in the future,” says Maher. “This could really be a game-changer for aircraft manufacturing.”
Related Content
Plant tour: Albany Engineered Composites, Rochester, N.H., U.S.
Efficient, high-quality, well-controlled composites manufacturing at volume is the mantra for this 3D weaving specialist.
Read MorePlant tour: Joby Aviation, Marina, Calif., U.S.
As the advanced air mobility market begins to take shape, market leader Joby Aviation works to industrialize composites manufacturing for its first-generation, composites-intensive, all-electric air taxi.
Read MorePlant tour: Spirit AeroSystems, Belfast, Northern Ireland, U.K.
Purpose-built facility employs resin transfer infusion (RTI) and assembly technology to manufacture today’s composite A220 wings, and prepares for future new programs and production ramp-ups.
Read MorePEEK vs. PEKK vs. PAEK and continuous compression molding
Suppliers of thermoplastics and carbon fiber chime in regarding PEEK vs. PEKK, and now PAEK, as well as in-situ consolidation — the supply chain for thermoplastic tape composites continues to evolve.
Read MoreRead Next
Advanced Composite Cargo Aircraft proves large structure practicality
Dr. John Russell reports that the successful completion of a flying aircraft in the the Advanced Composite Cargo Aircraft program has demonstrated the holistic impact that composites technology can have on future aircraft development.
Read MoreCertification of bonded composite primary structures
OEMs develop technology to quantify uncertainty in pursuit of the no-bolt bondline.
Read More

