It’s no secret to anyone involved in aerospace composites that production rates in commercial aircraft assembly lines anchored by advanced layup processes — automated fiber placement (AFP) and automated tape laying (ATL) — have been constrained by the necessity of careful visual inspection and verification after each ply placement. Often, rework also must be done, by trained specialists, to meet quality assurance requirements. For a fuselage barrel or other large composite part that requires hundreds of plies, the impact of inspection and rework is significant.
In a paper presented several years ago by Robert Harper of Fives Cincinnati (Hebron, KY, US) and Allen Halbritter of The Boeing Co. (Chicago, IL, US), based on data from a generic fuselage barrel laid up using an optimized AFP process, inspection and rework accounted for more than 60% of the total part production time. More recently, Todd Rudberg, senior engineer at Electroimpact Inc. (Mukilteo, WA, US), says manual inspection/repair activities typically constitute more than 30% of the time distribution for a part build.
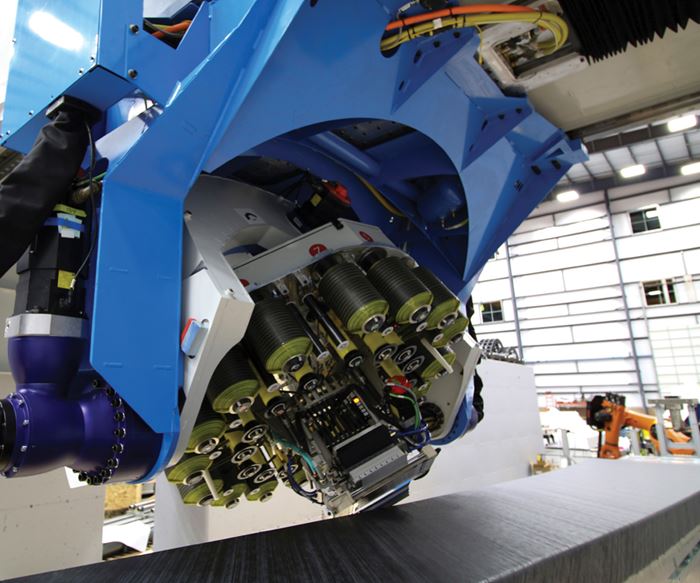
Over the past several years, much research and development has been devoted to finding a path to automated inspection using digital methods, to permit the overall aircraft production process to keep pace with the efficiency of today’s AFP and ATL processes. Toward that end, aerospace composite parts are now being made by ATL and AFP machines equipped with onboard, automated inspection systems. ATL/AFP machine suppliers have developed, and continue to refine, systems capable of inspecting layups and alerting technical staff to anomalies on the fly. In the first of a series of articles on this topic, CW takes a look at automated, in-situ inspection equipment developed for Electroimpact’s AFP machines.
Eliminating manual inspection
Electroimpact got its start in 1986, when founder Peter Zieve commercialized his first low-voltage electromagnetic riveting machines for aluminum aircraft assembly, which offered safer, less expensive and less noisy technology than existing riveting machines used by aerospace OEMs. Since then, the company has thrived by expanding its focus to provide a range of automated production solutions for metals and composites. Customers include not only Boeing but other aerospace OEMs, including Airbus (Toulouse, France), Bombardier (Montreal, QC, Canada), Spirit AeroSystems (Wichita, KS, US) and many more.
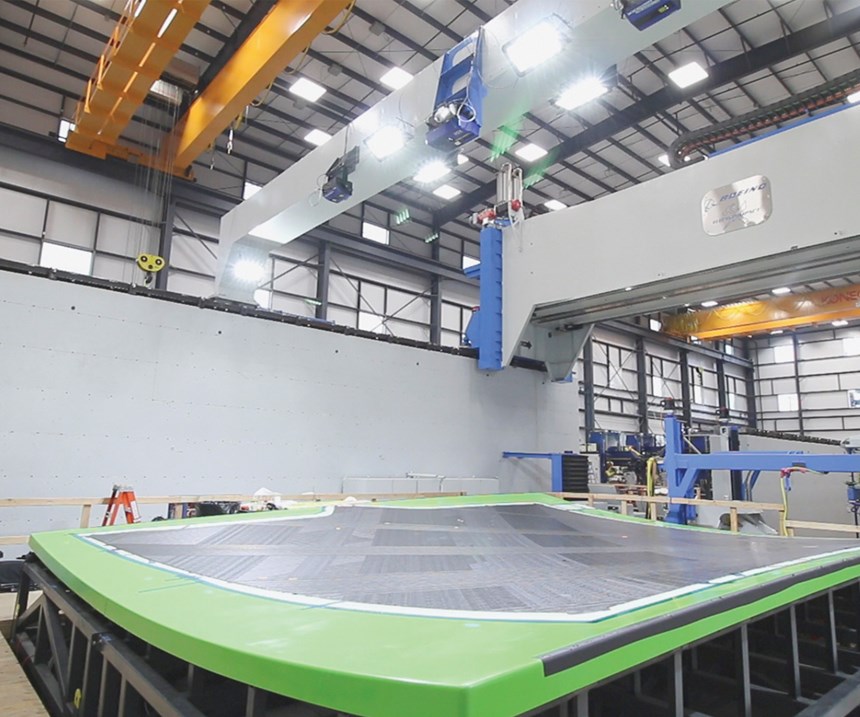
“We’ve been developing automated, in-process inspection over the past three years. Ours is currently the only automated inspection system that is fully certified by an OEM for composite part production,” says Rudberg, who was on the team that developed Electroimpact’s first AFP machine and its control software. Indeed, the company’s AFP machines are producing the first-article wing panels and wing spars for Boeing’s first 777X test aircraft, and automated inspection has been implemented for the wing panel parts. These are fabricated in two Electroimpact-designed, automated workcells at Boeing’s new Composite Wing Center (CWC) in Everett, WA, US, built specifically to handle fabrication and production of the 777X’s composite wings, the world’s largest. Notably, the aircraft’s massive 72m wingspan will be reduced, on the ground, via folding wingtips, each 3.5m long, to enable the plane’s crew to access the same airport gates as today’s 777. The 777X wingtips and folding hardware will be made at Boeing’s facility in St. Louis, MO, US. Two more Electroimpact workcells have been installed at the CWC to produce the one-piece, composite wing spars (more on those below).
The wing panels are made in two halves (upper and lower) via AFP in low-curvature, male molds positioned inside each workcell’s gantry work envelope, explains Josh Cemenska, controls engineer at Electroimpact. The main gantry, on which an Electroimpact AFP head is mounted, travels along the length of the 30m wing panel tool, and a bit beyond, while the head itself can move 7.5m across the gantry, to access the entire 9m width of the tool at its widest point; the head’s z-direction travel is about 2m. The material is 34-mm/1.5-inch wide carbon/epoxy prepreg tape, supplied by Toray Composite Materials America (Tacoma, WA, US).
“For the 777X panels, automated inspection was a necessity,” asserts Rudberg. “The parts are so large, you really can’t do manual inspection. Our automated inspection system was really an enabling technology for this next-generation wing.” Cemenska explains that in a manual process, inspectors verify tow end accuracy by visually comparing the layup to a laser outline projected onto the tool surface, then painstakingly scan the surface for other flaws such as gaps, overlaps or missing tows, using hand-held magnifiers.
Replacing this, the Electroimpact wing panel cells integrate three 20.5-kg LASERVISION projector box units, each equipped
with a high-resolution camera in addition to a laser projector. Supplied by Aligned Vision (Chelmsford, MA, US), the units each work together with a laser profilometer — essentially a small laser that projects a line onto the work surface — which is mounted on the head. All three elements (laser, camera, profilometer) feed data to a user interface supported by computer software algorithms.
The Aligned Vision projector box units are mounted in a row on a second gantry beam that operates independently of the head gantry, but typically follows behind it. Rudberg says the configuration minimizes the distance between the lasers and the part, and reduces the angle of incidence. Explains Aligned Vision’s COO Matt Zmijewski, “The 777X wing panels and spars are the launch applications for LASERVISION, which delivers two key functions. From one aperture, a laser is projected, positioned by a set of two steerable mirrors. From a second aperture, a high-resolution digital camera with a 300-mm lens is also steered by two mirrors to capture pictures of the in-process material deposition.”
The high-definition images are precisely located in three dimensions, because the camera and the laser work within the same coordinate system, “transformed” or registered to the tool and head locations in space. The 3D location of each camera pixel is identified by the user interface. Image sets are conjoined to create a complete image of each ply over the entire part. Image resolution is high enough that ply boundary locations can be measured automatically from that image. Electroimpact says that camera images of ply boundaries have been qualified to be within ±0.060 inch/±1.5 mm of the true position in a mobile (i.e., gantry-mounted) setup.
Leveraging big data
Meanwhile, the laser profilometer projects a line onto the part surface during material laydown, and its built-in detector array measures the height of more than 1,000 discrete positions along that laser line, says Cemenska. Thus, it detects a 2D profile of the surface. As the profilometer rides along with the head during material deposition, it creates, in effect, a 3D surface profile.
As explained in two recent white papers authored by Cemenska, Rudberg and colleagues Michael Henscheid, Andrew Lauletta and Bradley Davis, the profilometer’s laser line spans the seams between tows, measuring the width of any overlaps and gaps as layup proceeds. These profilometer data are integrated with the data from the camera and the part programs, as well as operator input, within the inspection user interface; the interface builds a ply-by-ply 3D model of the part as production progresses.
Recognition software measures the locations of features from the vast amount of camera image data, as well as the raw data array generated by the profilometer, to see tow ends (or ply boundaries), tow overlaps and gaps and identify defects such as puckering and bridging. It then displays these on the 3D model. The user interface and algorithms required to crunch the collected data were developed in-house by Electroimpact software engineers, says Rudberg. (A foreign object detection system not developed by Electroimpact is coming, according to Boeing.)
The Electroimpact automated ply boundary inspection system can correctly identify and measure 92% of tow ends on a standard ply, with a mean error smaller than ±0.005 inch and a standard deviation of ±0.020 inch. Rudberg says that overlap/gap measurements made with the profilometer, which happen in parallel with material laydown, can be accomplished significantly faster than manual inspection. In case a question about a tow end or a gap/overlap arises, select images are forwarded to an inspector for assessment on a computer screen in the workcell. Says Cemenska, “We’ve almost eliminated any manual inspection. If we find that rare case of an error, like a dropped tow, that area is displayed by the LASERVISION’s laser lines, and the bad tows are pulled off, if necessary. The machine head is then reprogrammed to conduct the repair.” Cemenska adds that in the case of the wing panel parts, many tow ends can be eliminated from inspection, because part edges are subsequently trimmed, which saves additional time.
Inspection speed depends on ply complexity, and it decreases as the number of tow ends increases, which is why the inspection system for the wing panels was a higher priority than for the spars, says Rudberg: “Because of the part size and flat shape, and because Boeing didn’t want inspectors walking on the layups, it was a priority to get the automated inspection system on the panel part up and running, so we focused our efforts there. With regard to the wing spars, the layup and lamination were the major hurdles, so we worked on that aspect first.”
Cemenska reports that the inspection system can measure 15 tow ends per second; on the wing panel part with up to 2,000 inspected tow ends, it takes a few minutes for the following cameras to take the photos and the software to assemble the ply image. Overall, says Rudberg, complex plies take from 3-5 minutes to image and process: “At this time, we’re aiming for 100% inspection, so the 8% of tow ends we don’t identify are currently being located ‘semi-automatically,’ with human eyes, so that adds about 10 minutes.” He adds that this semi-automatic step can be accelerated by making the software system faster. Eventually, the need to find that 8% could be eliminated altogether if statistics show that the 92% of identified tow ends accurately represent the entire part. “These are early days, and there is still room for improvement — as confidence in the system grows, the human double-check can be reduced to nearly zero, going forward.”
The system was validated by Electroimpact in partnership with Boeing by performing a series of rigorous pre-acceptance tests: “Test panels were laid up with a range of intentional mistakes, and we ran the automatic inspection system during all the layups. Then, those panels were inspected manually, and the manual results were compared to the automated system results,” say Rudberg and Cemenska. Those results convinced Boeing of the system’s reliability, resulting in its adoption for the 777X parts. In-process inspection of the one-piece spars — the largest ever produced, says Boeing — was scheduled for implementation early this year.
Concludes Rudberg, “This is a smart use of big data. We’re measuring every tow relative to the ply boundaries and creating a digital record of the results. These data improve part quality, and allow the client to make more informed decisions. Because we can prove part quality digitally, it ultimately will allow use of less restrictive design allowables.”
The time has certainly come for a sorely needed technology that allows automated composites fabricating machines to operate at the speeds for which they were designed. No doubt, it will be applied to additional parts. CW will continue to follow developments — stay tuned.
Related Content
Plant tour: Joby Aviation, Marina, Calif., U.S.
As the advanced air mobility market begins to take shape, market leader Joby Aviation works to industrialize composites manufacturing for its first-generation, composites-intensive, all-electric air taxi.
Read MoreCombining multifunctional thermoplastic composites, additive manufacturing for next-gen airframe structures
The DOMMINIO project combines AFP with 3D printed gyroid cores, embedded SHM sensors and smart materials for induction-driven disassembly of parts at end of life.
Read MoreCarbon fiber, bionic design achieve peak performance in race-ready production vehicle
Porsche worked with Action Composites to design and manufacture an innovative carbon fiber safety cage option to lightweight one of its series race vehicles, built in a one-shot compression molding process.
Read MoreJeep all-composite roof receivers achieve steel performance at low mass
Ultrashort carbon fiber/PPA replaces steel on rooftop brackets to hold Jeep soft tops, hardtops.
Read MoreRead Next
All-recycled, needle-punched nonwoven CFRP slashes carbon footprint of Formula 2 seat
Dallara and Tenowo collaborate to produce a race-ready Formula 2 seat using recycled carbon fiber, reducing CO2 emissions by 97.5% compared to virgin materials.
Read MoreDeveloping bonded composite repair for ships, offshore units
Bureau Veritas and industry partners issue guidelines and pave the way for certification via StrengthBond Offshore project.
Read More“Structured air” TPS safeguards composite structures
Powered by an 85% air/15% pure polyimide aerogel, Blueshift’s novel material system protects structures during transient thermal events from -200°C to beyond 2400°C for rockets, battery boxes and more.
Read More


