Notched testing of sandwich composites: The sandwich open-hole compression test
A new ASTM-standardized open-hole compression test method seeks to determine the notch sensitivity of sandwich composites.
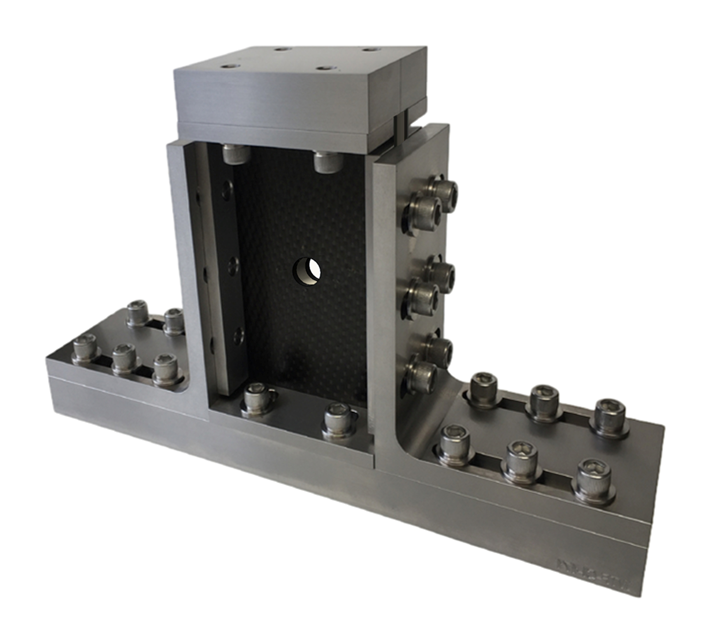
Fig. 1. ASTM D8454 sandwich open-hole compression test fixture and specimen. Photo Credit, all images: Dan Adams.
Notched testing of composites refers to the testing of specimens with a centrally located, machined through-hole under a specified loading condition. Often referred to as open-hole tests, they were initially developed in the early 1980s for composite laminates to evaluate toughness increases in new composite materials. The through-hole represented idealized impact damage or a manufacturing defect, enabling meaningful toughness comparisons between different materials.
Open-hole test methods for composite laminates were eventually standardized in the 1990s by ASTM International (Conshohocken, Pa., U.S.) for tension loading (ASTM D57661) and compression loading (ASTM D64842). Both test methods use a 36-millimeter-wide specimen with a centered, 6-millimeter-diameter hole, producing a width-to-diameter (w/D) ratio of 6:1. Beyond toughness comparisons, these test methods are used to determine the notch sensitivity of composite laminates, defined as the reduction in ultimate strength or strain allowables due to the presence of a hole.
When used for material comparisons, notched testing is typically performed using a quasi-isotropic composite laminate, consisting of equal numbers of 0°, 45°, -45° and 90° oriented plies. In contrast to metals, notched strengths of composites are extremely difficult to predict, even using current state-of-the-art finite element analysis (FEA) methods, as the damage states produced around the hole are significantly more complex than the yielding produced in metals. Therefore, notched testing continues to be used to experimentally determine the notch sensitivity of composite materials.
Until recently, considerably less emphasis has been placed on developing standardized notched test methods for sandwich composites. However, two new notched sandwich test methods were standardized in 2022 by ASTM: a sandwich open-hole compression (OHC) test and a sandwich open-hole flexure (OHF) test. In this column, I’ll focus on the new compression-loaded notched test method for sandwich composites (Fig. 1), ASTM D84543.
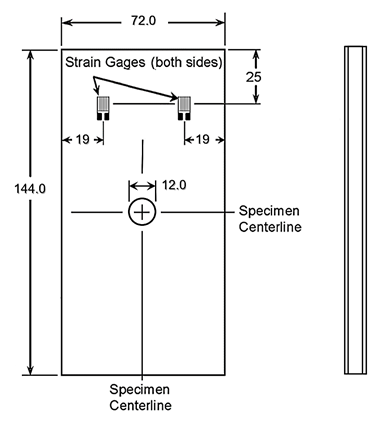
Whereas quasi-isotropic laminates are typically used for laminate OHC testing, the facesheet ply layup and core configuration for sandwich composite OHC testing are frequently selected to represent the intended structural application. In some cases, however, the core thickness must be increased to avoid specimen instability under compression loading. Similar to the laminate OHC specimen, the sandwich OHC specimen (Fig. 2) was designed to produce statistically significant differences in measured notched strengths between notch-sensitive and insensitive facesheet laminates. Additionally, the specimen geometry was designed to minimize finite-width and finite-length effects on the stress concentration produced by the centrally located hole.
Based on the results of a numerical and experimental investigation4, the same w/D ratio of 6:1 specified in the standardized laminate OHC test was selected. However, the specimen width was increased to 72 millimeters and the hole diameter to 12 millimeters, twice the dimensions of the laminate OHC specimen. This width increase was required to accommodate four bonded strain gages that are used for specimen alignment prior to testing.
A specimen length-to-hole diameter (l/D) ratio of 12:1 was selected to minimize the interaction between the open-hole stress concentration and the specimen ends, resulting in a sandwich specimen length of 144 millimeters. The four strain gages used for alignment are located near the corners at one end of the test specimen (19 millimeters from the specimen edges and 24 millimeters from the specimen end), positions at which strain gradients are minimized4.
The sandwich OHC test uses an end-loading test fixture with knife-edge side supports (Fig. 1). The test fixture design is similar to that used in the ASTM D71375 laminate compression after impact (CAI) test, but sized to accommodate a 72 × 144-millimeter sandwich specimen (in comparison to a 100 × 150-millimeter laminate specimen). The bottom assembly includes a base plate and two adjustable angle supports that are bolted to the base. The base plate has two flat-faced adjustable supports that provide restraint to out-of-plane rotation as well as brooming of the specimen ends. Each angle support has an attached set of adjustable knife-edged side supports that provide out-of-plane restraint to specimen buckling. The top assembly consists of a top plate with the same flat-faced adjustable supports used on the base plate. The side plates are sufficiently short to ensure that a gap is maintained between the side rails and the top plate during the test.
After inserting the open-hole sandwich specimen into the test fixture, the assembly is placed between the platens of the testing machine. Specimen alignment is performed by monitoring the four strain gage outputs while a compression force of approximately 10% of the anticipated ultimate force is applied. The use of an adjustable spherical-seat platen that includes a position-locking feature is encouraged, but not required, for specimen alignment. If not used, shimming between the fixture and platen may be performed. A difference in strain from any of the strain gages indicates bending in the specimen. By making adjustments to the spherical-seat platen or by shimming, the alignment procedure is repeated until all four strain gage readings are within 10%.
The specimen is then compression loaded at a constant displacement rate and the applied force, crosshead displacement and strain data are recorded. The test is ended once a peak force is reached and the measured force drops by more than 30% from the peak value. Following testing, the type, area and location of failure are recorded for each specimen. The only acceptable failure modes are those that pass through the open-hole in the test specimen.
Although the through-hole produces a reduced net section, it is common practice to develop notched design allowables based on gross section stress to account for various stress concentrations (flaws, damage, etc.) that are not explicitly accounted for in stress analyses. Therefore, the open-hole compression strength is calculated based on the cross-sectional area of the two facesheets, disregarding the reduced area produced by the hole. While this test method may also be used to test unnotched sandwich specimens and determine strength reductions due to notch sensitivity, care should be taken to prevent undesirable failure modes such as end crushing. Note that ASTM C3646, originally standardized in 1955, remains the recommended test method for unnotched sandwich panel compression strength.
References
1 ASTM D5766/D5766M-11(2018), “Open-Hole Tensile Strength of Polymer Matrix Composite Laminates,” ASTM International (W. Conshohocken, PA, US), 2018 (first issued in 1995).
2 ASTM D6484/D6484M-20, “Open-Hole Compressive Strength of Polymer Matrix Composite Laminates,” ASTM International (W. Conshohocken, PA, US), 2020 (first issued in 1999).
3 ASTM D8454/D8454M-22, “Open-Hole Compressive Strength of Sandwich Constructions,” ASTM International (W. Conshohocken, PA, US), 2022.
4Stanfield, M., Kuramoto, B., and Adams, D.O., “Development and Evaluation of the Sandwich Open-Hole Compression Test,” to appear in Journal of Sandwich Structures and Materials, 2023, doi:10.1177/10996362221115052.
5 ASTM D7137/D7137M-17, “Compressive Residual Strength Properties of Damaged Polymer Matrix Composite Laminates,” ASTM International (W. Conshohocken, PA, US), 2017 (first issued in 1999).
6 ASTM C364/C364M-16, “Edgewise Compressive Strength of Sandwich Constructions,” ASTM International (W. Conshohocken, PA, US), 2016 (first issued in 1955).
Related Content
Damage tolerance testing of sandwich composites: The sandwich CAI test
A new ASTM-standardized test method established in 2022 assesses the compression-loaded damage tolerance of sandwich composites.
Read MoreTesting to support composite bolted joint analysis
An overview of ASTM Standard Guide D8509, and its coupon-level mechanical testing of design properties for analyzing composite bolted joints.
Read MoreDamage tolerance testing of sandwich composites: The sandwich flexure-after-impact (FAI) test
A second new ASTM-standardized test method assesses the damage tolerance of sandwich composites under flexural loading.
Read MoreCrashworthiness testing of composites: A building block approach, Part 2
Following the previously discussed coupon-level testing element, subcomponent and component testing are the next steps in designing crashworthy composite structures.
Read MoreRead Next
Material equivalence testing in shared composites databases
In response to traditionally proprietary polymer matrix composites (PMC) qualifications, NCAMP continues its efforts to make material property databases publicly available.
Read MoreDetermining the equivalency of composite test methods
While time consuming and somewhat subjective, the comparative assessment approach has been proven effective toward assessing composites test method equivalence.
Read MorePlant tour: Daher Shap’in TechCenter and composites production plant, Saint-Aignan-de-Grandlieu, France
Co-located R&D and production advance OOA thermosets, thermoplastics, welding, recycling and digital technologies for faster processing and certification of lighter, more sustainable composites.
Read More

