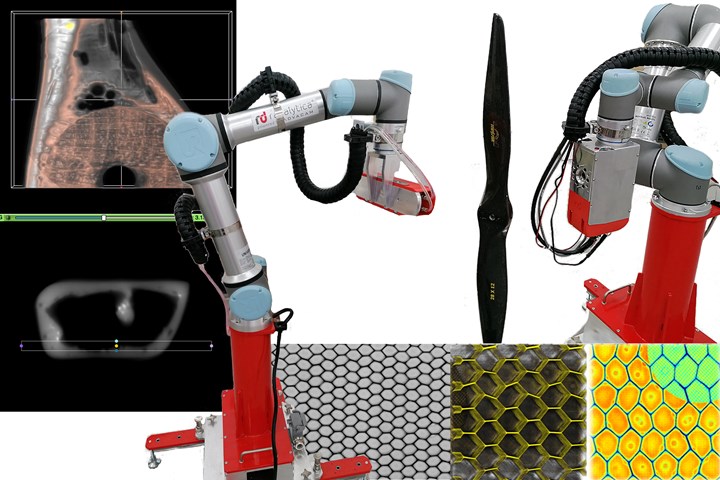
Radalytica (Olomouc, Czech Republic) has developed the unique robotic imaging system “RadalyX”, which combines collaborative robots with state-of-the-art x-ray imaging sensors to significantly expand and improve nondestructive testing (NDT) for composite parts. “The photon-counting detectors are produced by Advacam s.r.o., our partner company that began as a startup from a university,” explains Martin Josifek, sales manager for Radalytica. “The detector chip technology originates from a collaboration led by CERN in Switzerland, which continues research on it.” Note, CERN is the world’s largest particle physics lab that developed the Hadron collider. “This detector chip technology is very versatile and therefore it is also used by NASA on the International Space Station to monitor space radiation,” adds Josifek.
“Photon counting detectors are much more sensitive than current x-ray imaging technology,” he continues. “Advacam was founded to commercialize these detectors, but often customers wanted not just the detectors but a full solution for NDT. So, Radalytica was formed, combining the detectors with several other unique technologies to provide a novel type of robotic inspection system.”
Collaborative robots, higher resolution
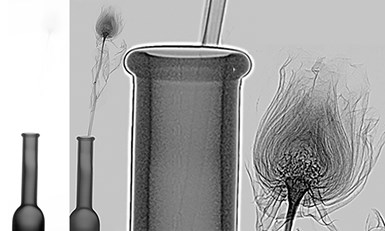
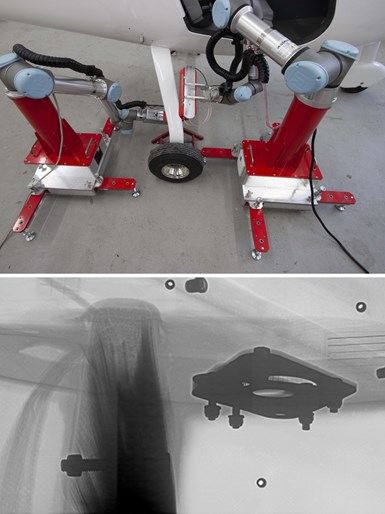
Conventional X-ray systems cannot image the dried rose (left) while Radalytica’s more sensitive detectors can image all parts of the rose simultaneously — the head and even a stem inside of the vase.
Josifek explains that current x-ray technology is limited, both in terms of image quality and also in the shapes that can be inspected. “An example of the resolution and novel capability offered by our detectors is a dry rose. Standard x-ray inspection cannot see the rose, only the vase. But with our technology, you can see all of the details of the rose.”
“Industrial CT, although very powerful for resolution and the ability to develop 3D models,” he continues, “is also limited to smaller size samples because they must be put into a chamber or on a rotating bed. But our technology is based on two independent robots. One emits the x-ray and the other carries the detector, with the sample in between. The robots can be positioned independently, thus, we are not limited by the shape or size of the sample, and we can inspect curved shapes. The system can be used as a fixed NDT station or a portable inspection unit. It can also be integrated into existing production for inline inspection.”
Radalytica’s robots move precisely together in six axes and rails can be added for a seventh axis, enabling scanning of large structures such as aircraft wings and wind blades. “This synchronization and calibration of the robots is also our know-how,” says Josifek, “which is key for CT as the movement must be exact for quality imaging.”
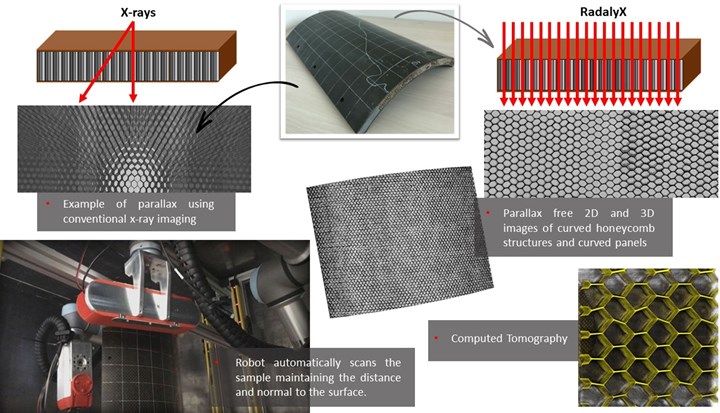
Another advantage of this “scanning” approach is the elimination of parallax effect. “This is caused by the fact that an x-ray beam is a cone,” Josifek explains. “But our system, using two robots, simulates a parallel beam, so there is no parallax. It means flat or curved honeycomb structures can be inspected for a variety of flaws, including the presence of water in cells, in an easy and automatic manner.”
Radalytica’s synchronized robots and unique x-ray detectors can eliminate the parallax effect when scanning honeycomb core, even on curved structures.
“With our patented technologies, we can inspect at a higher level —in terms of resolution, the ability to detect defects and also regarding industrialization — than what is currently possible at the major aircraft OEMs and Tier suppliers,” he asserts. “Thus, we can improve and extend inspection quality, and also help during R&D of materials and structures.”
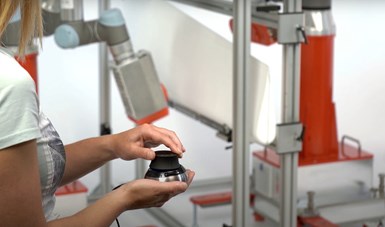
3D Mouse, fast inspection
3D Mouse is another key development. Radalytica uses a modified type of mouse to control the movement of the robots which then controls the position and viewing angle of the x-ray image that is displayed in real-time on the computer screen. “3D Mouse uses simple manual control and a live view, which provides immediate feedback between your controlling the direction of view and the x-ray image,” explains Josifek. “So, it is a very intuitive type of control, and it works very well for locating defects inside the inspected structure in 3D.”
“3D Mouse also allows an operator to quickly get an idea about 3D structures inside the sample without CT,” he adds. “For example, CT requires time, because you need to have a lot of pictures from many angles. But for fast inspection, you would use our real-time X-ray imaging to see a live 2D X-ray image while moving the view freely around the object with the 3D Mouse. This makes X-ray imaging very similar to visual inspection using our brain. For example, when we see a bubble in a glass of water, we rotate it to see if the bubble is in the front or back. This is the same principle that we are using during our robotic inspection using 3D Mouse and X-rays. Robots and 3D Mouse make even visually opaque objects transparent. So, it is much easier and natural to inspect them rather than using a lengthier CT process.”
This technology also allows for remote operation. “3D Mouse provides a solution that can be connected by internet,” says Josifek. “So, for example, an aircraft lands in Southeast Asia that has suspected damage and needs to be inspected, but the certified NDI specialist is in Seattle. It’s no problem, because he can control the inspection from Seattle, using the 3D Mouse. There is no need to travel. This is much more efficient for the industry.”
Multimodal inspection
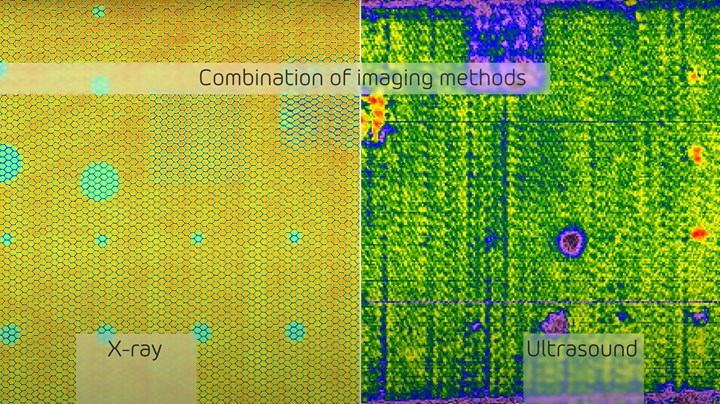
Radalytica is also combining x-ray with ultrasound testing (UT) for multimodal inspection. “This is helpful with impact damage, for example, because delamination is not detectable by x-ray but it's very well detected by ultrasound,” notes Josifek. “For impact damage, high-resolution x-ray imaging provides a lot of details if there are cracks, but you cannot see any surrounding delamination. With ultrasound, however, you can see the delamination but not all of the details of the impact. So, we are combining the two technologies to provide a much better overview of what is happening. As far as we know, nobody else is doing that.”
Radalytica will combine even more techniques in the future. “We have already integrated imaging modules such as laser surface profiling,” says Josifek, “and we will also look at thermal techniques, including thermography. We are even working on X-ray diffraction that, among other benefits, gives very good information about composite fiber orientation.”
Laser surface profiling
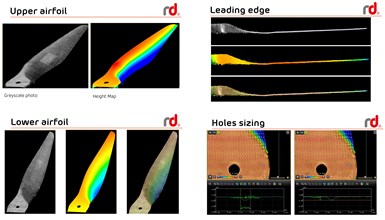
“This is an inspection for surface quality but also for assuring shape and dimensions,” he says. “You scan with the laser profilometer to get the dimensions and images of the surface and then the system can create a 3D model which is compared with the CAD file.” Laser surface profiling is used to inspect propellers, for example, “because their shape is very important,” says Josifek. “If you have a wrong shape, then there is a lower power output.”
“Laser profiling is also a good option if no volumetric defects are necessary to detect,” he notes. “But it is beneficial as well in combination with CT where the laser complements the CT in robot control and data analysis.” Josifek explains: “We use the laser surface measurement for programming the robot. We need to see the exact position and exact shape of the sample. So, the first step is that the laser scans the surface, and then the robots can follow the surface for the 2D X-ray, CT or UT scan. Note, that if this movement is not exact, there will be errors in the images.”
Imaging possibilities
Josifek describes how elimination of parallax and multimodal inspection allows, for example, the creation of a digital 3D model of a honeycomb-cored airfoil. “We have been doing this type of work with a manufacturer of small aircraft here in the Czech Republic. We have inspected some wings for them, looking for visible defects inside of parts, adhesive distribution in bondlines, etc. We found cracks close to screws in one composite laminate which were not visible from the outside nor with a standard x-ray system.”
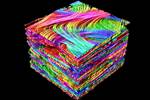
The RadalyX detectors can also scan in what is termed “spectral mode” where the wavelength of X-rays is measured. This is useful to differentiate kinds of materials in the object and give them different colors – a kind of “color X-ray” (see opening image) similar to those in security checks on airports. “This type of measurement and visualization can be very helpful,” says Josifek.
Laminography
“This uses a similar principle as CT, but instead of turning a sample through 360 degrees and taking an image at each angle, you just use limited angles for a quicker analysis,” explains Josifek. “For example, a whole wing is too large for CT, so you would use laminography at limited angles. One robot on top and the other below. You would take images at only 90° to 45°, for example, which is enough to resolve structures inside the wing in depth. It may not be as high resolution in depth as CT, but it is very often enough to give the information you need to identify defects and damage. It could be understood as a way to focus the x-ray image to a different depth of the part to inspect, for example, bondlines or mating surfaces inside a closed structure.”
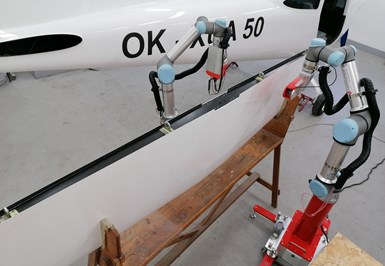
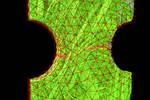
The synchronized robots used in the RadalyX technology enables real-time 3D scanning from any angle and imaging large, complex parts — including parts much larger than the airfoil shown here.
Size of inspection vs. resolution
The RadalyX system can provide resolution down to 50 microns. Though the robots can handle large parts, inspection areas are limited by the memory on the computer graphics card to process the images for reconstruction. “If you have a large object and you have a higher resolution,” Josifek explains, “then that’s a lot of data which must be processed by a computer. This is why we typically narrow CT scans to a localized area of interest, not the complete wing. If you wanted to CT scan a complete wing with such a high resolution, there is no computer in the world that can process all of that data.”
Safety
“Because our detectors are very sensitive, they require typically only half the energy of standard x-rays to provide the same inspection,” he notes. “This lower energy x-ray emission makes it much easier to achieve the necessary protective shielding. Note that the required shielding thickness is nonlinear with respect to x-ray energy, so our shielding can be as low as 25% of what is required for traditional x-ray inspection. Distance is also used to meet safety requirements. But if you have a lower power the distance is also smaller.” Radalytica has a radiation protection specialist that evaluates each installation to make sure the necessary protection is in place and meets local legal requirements.
Easy programming, data analysis
Are robotics experts required to operate this equipment? “No,” says Josifek. “We have the robotics experts and they have programmed the system so that it is easy to operate. Everyone can operate the system after only one day of training, which we provide with the system. The software provides easy control of the system. You need only to set up the start position and the directory of positions to complete the inspection and the software will do everything alone.”
“With regards to the images and visualization, 2D inspection is possible right away, exported from the software during inspection,” he says. “3D reconstruction depends on the application, but in most cases, that data is also processed fully automatically. We are constantly finding new applications and adjusting the software to optimize for these as well. So, we are creating a library of such new end-uses and inspection applications, from stainless steel to FRP to ceramics, and we will provide our customers with access to these.”
Josifek explains that as part of the installation process, Radalytica provides system training, “and we also set up the software for the customer’s application. But if new applications arise, we will work with them. That is indeed part of what we are offering — huge flexibility in what is possible and we are still finding many new applications for this system.”
Cost and future applications
Josifek says that the price of a RadalyX system depends on the configuration,number of modules and level of customization. However, the cost of a standard system is actually lower than that of a typical mid-size industrial CT machine.
Radalytica sees many different applications for a wide range of industries, from composites in aerospace and automotive to medical applications, the food industry and forensic art investigations. “We have inspected everything from centuries-old paintings (in collaboration with the company InsightART) to wooden propellers and titanium bike frames, to steel, composites and ceramics,” says Josifek.
“And we are combining our system with neural networks so that we can make it learn and better automate large or complex inspections. This is another benefit of our approach. We are teaching the software what is okay and what is not, but in the end, when is it properly done, the system will be able to complete these inspections in an automated way and also recognize anomalies. For composites, we see everything from simple scans for damage in problem areas to 100% inspectability of bondlines to intelligent inspection of complex assemblies, but all will provide improvements in quality and cost.”
Related Content
Bio-based acrylonitrile for carbon fiber manufacture
The quest for a sustainable source of acrylonitrile for carbon fiber manufacture has made the leap from the lab to the market.
Read MoreSulapac introduces Sulapac Flow 1.7 to replace PLA, ABS and PP in FDM, FGF
Available as filament and granules for extrusion, new wood composite matches properties yet is compostable, eliminates microplastics and reduces carbon footprint.
Read MorePEEK vs. PEKK vs. PAEK and continuous compression molding
Suppliers of thermoplastics and carbon fiber chime in regarding PEEK vs. PEKK, and now PAEK, as well as in-situ consolidation — the supply chain for thermoplastic tape composites continues to evolve.
Read MoreNatural fiber composites: Growing to fit sustainability needs
Led by global and industry-wide sustainability goals, commercial interest in flax and hemp fiber-reinforced composites grows into higher-performance, higher-volume applications.
Read MoreRead Next
CW Trending: democratization of composites
Learn from CW Editors about the trends they are seeing in the democratization of composites.
Read MorePart 2: Applying CT scan data analysis and visualization to composites
Advanced CT-scan analyses can offer deep insight into challenges faced when examining novel composites and hybrid material behavior or performing quality and certification testing. Part two of a two-part series.
Read MoreApplying CT scan data analysis and visualization to composites
Imaging and analysis via computed tomography (CT) has potential for certifiable safety and business sustainability and could be key for interior inspections of composite parts. Part 1 of a two-part series.
Read More


