Structural health monitoring: NDT-integrated aerostructures
SHM moves from structural testing to an FAA-qualified inspection alternative, to reduce cost, streamline operations and mature toward lighter, more robust smart structures
Structural health monitoring (SHM), essentially, involves a nondestructive testing (NDT) system that integrates sensors into a structure to enable continuous or periodic inspection. The resulting data enable operators to identify the initiation and growth of damage in situ — without the expense or time required to take the structure out of service, then disassemble and manually inspect it. Ideally, it also determines the damage type, location and size as well as the structure’s health prognosis.
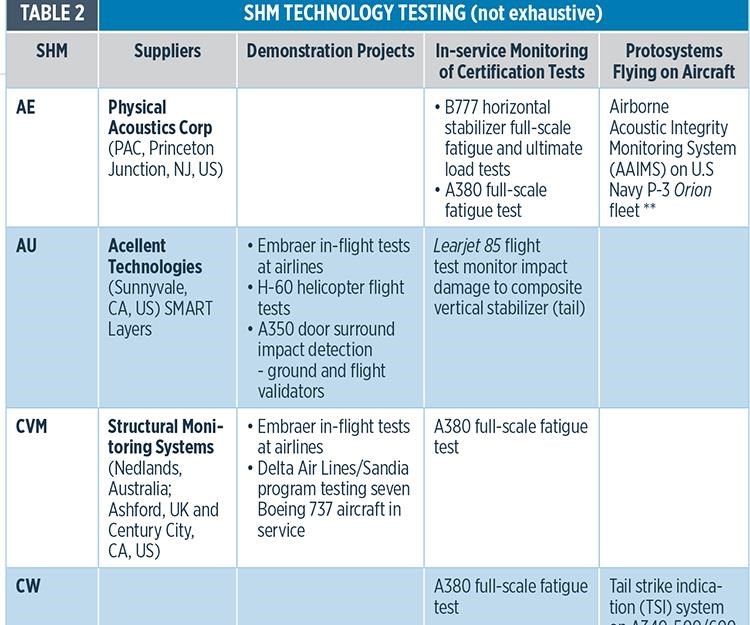
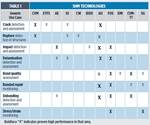
When CW last explored the range of developing SHM technologies, in 2008 (see “Structural health monitoring: Composites get smart,” under "Editor's Picks," at top right), it reported that some were nearing commercial readiness. Since then, the Aerospace Industry Steering Committee SHM-AISC was formed and first met in 2009. Its members — all the major aircraft OEMs as well as operators, regulators and technology suppliers — are striving to standardize SHM integration and certification requirements and to mature systems for widespread use. They achieved a critical milestone in 2013 with guidelines for SHM implementation on fixed-wing aircraft, published by SAE International (Warrendale, PA, US) as Aerospace Recommended Practice ARP-6461. Today, SHM systems are well proven as tools to monitor structural and in-flight certification tests, and the first applications for monitoring structures in service are now flying on commercial and military aircraft (see Table 2, at left).
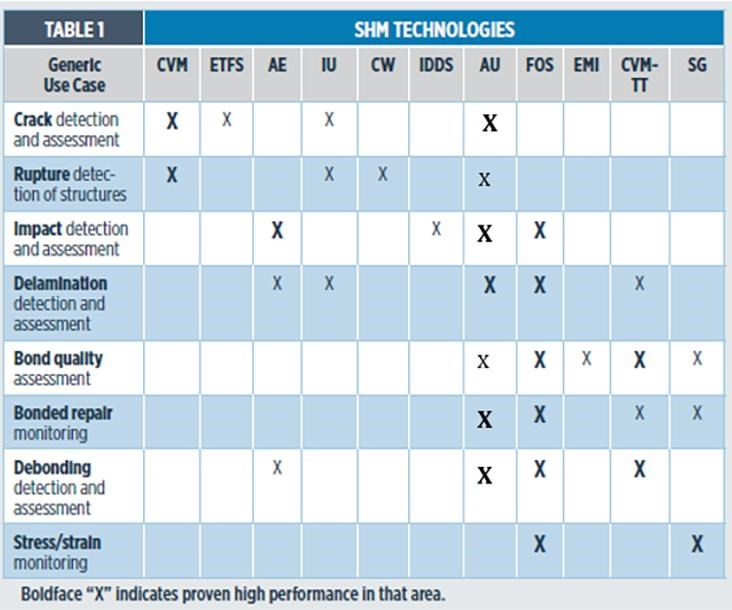
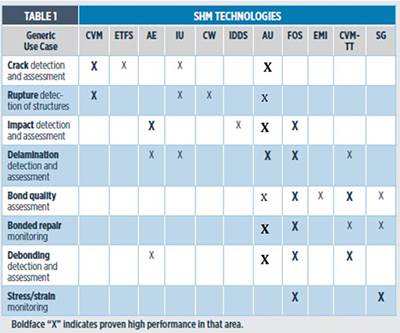
As a sign of this impetus and a possible tipping point, seven of The Boeing Co.’s (Chicago, IL, US) 737 narrowbody aircraft operated by Delta Air Lines (Atlanta, GA, US) have been outfitted with Comparative Vacuum Monitoring (CVM) sensors for crack detection (see “Structural health monitoring: The toolbox,” at the end of this artice or click on its title under "Editor's Picks") in a program that aims to obtain approval for SHM as an alternative inspection method by 2016. Part of a broader SHM initiative at the Airworthiness Assurance Nondestructive Inspection Validation Center (AANC) operated by Sandia National Labs (Albuquerque, NM, US) for the US Federal Aviation Admin. (FAA, Washington, DC, US), its goal is to schedule maintenance based on the actual condition of each aircraft’s structures rather than on fixed time periods based on the average performance of an entire fleet. This could save millions of dollars in revenue currently lost due to lengthy but often unnecessary manual inspections and aircraft downtime.
At Airbus Operations Germany (Bremen), Dr. Clemens Bockenheimer, SHM leader and head of A350 composites, surface and standardization, reports that local SHM — limited-area monitoring close to sensors — has moved away from R&D and is now ready for qualification per specific aircraft application. Although reliability assessment for global SHM monitoring (systems that simultaneously monitor the health of an entire aircraft) is still in development, Airbus is proceeding with local SHM technology-readiness requirements. In fact, Airbus drafted the requirements section of ARP-6461 and is preparing the Validation & Verification (V&V) Center within Airbus Materials, Process & Testing (MP&T) as its single entry point for SHM technology, with sister Airbus Group company, Testia GmbH (Bremen, Germany), named as
the center’s operator. Testia will help coordinate testing and other requirements with SHM technology companies, OEMs, parts manufacturers and aircraft operators, to minimize maturation time and cost. “This is a new and fresh approach that is just now being communicated to the industry,” says Testia CEO Holger Speckmann.
Looking mainly at the two most mature systems — CVM and an acousto-ultrasonics (AU) technology called SMART Layers — CW here walks through SHM’s entry into service and the potential it offers for future composite aerostructures.
SHM already in service
SHM has become a standard tool used in aircraft certification to monitor structures during ultimate load and fatigue tests. Sensors installed across components and complete aircraft structures eliminate the need to stop the test for manual inspection of selected areas. For example, acoustic emission (AE) sensors from Physical Acoustics Corp. (PAC, Princeton Junction, NJ, US) were used to monitor Boeing’s full-scale fatigue testing of the carbon fiber reinforced plastic (CFRP) horizontal stabilizer on its 777 widebody aircraft. Also used during the structure’s ultimate load and destruction tests, the AE systems supplied the data used in those cases to identify and evaluate subcritical damage propagation and to help define the part failure sequence.
Similarly, the Airbus (Toulouse, France) A380 full-scale fatigue test, performed by IABG (Dresden, Germany), simulated 47,500 flights over 26 months of cyclic loading and used a variety of SHM sensors, including CVM, eddy-current foil sensors (ETFS), acoustic emission (AE), and crack wires (each is defined in “The toolbox”). Installed throughout the fuselage and wings, these SHM systems provided detailed information about the initiation of cracks in the plane’s aluminum structure, CFRP center wingbox and glass fiber aluminum (GLARE) fuselage sections.
The Airbus A350 and Bombardier’s (Montréal, QC, Canada) Learjet 85 also used SHM during structure certification and/or flight testing, as do various SHM protosystems — early developments/smart structure forerunners that sense and communicate data about structures — flying on Airbus, Boeing and military aircraft today (see Table 2, at left).
One example, developed for the Airbus A340-500/600 family of long-haul aircraft, is the tail strike indication (TSI) system now also deployed on the Airbus A380. The TSI uses two sensors, each with two crack-wire lines for redundancy in sensing if the fuselage tail contacts the ground during take-off. If the conductive/resistive wires along the tail are disrupted, a cockpit indicator alerts the crew. A crewmember, then, can trigger procedures for inspection and proper maintenance actions before the plane resumes service. Integrating impact damage detection into the tail’s structural design has enabled weight savings because ground contact is no longer a damage case for which the tail must be overbuilt to sustain continued service. Instead, it is detected and dealt with immediately.
Another example is the Life-Time Monitoring System (LTMS), an optional installation on Airbus A400M aircraft, which uses strain gages to measure and record aircraft structural loads, including overloads, hard landings and total cycles accumulated. These data enable operators to better track aircraft use and associated fatigue for more efficient maintenance planning.
Local first, then global
“Confidence in local SHM applications for selected technologies, for example CVM and eddy current, is no longer an issue,” says Bockenheimer. Numerous demonstrator installations and durability tests for a wide array of SHM systems have been completed over the past two decades (see “Decades of SHM demonstrations build confidence in local SHM,” at the end of this article or click on its title under "Editor's Picks" at top right).
However, Bockenheimer cautions that local SHM applications are very different from global SHM systems. “Local is more restricted, monitoring under and close to the sensor, similar to conventional NDT, so how to prove it is more clear. For example, we proved Probability of Detection (POD) for CVM in 1995.” How to prove detection capability for global monitoring and how the whole system communicates across the fuselage and with other systems is still in development. The industry is gaining confidence, however, as it continues to accrue successful flight history with local SHM systems.
“The need now is for standardization in the process for qualification and implementation in specific aircraft applications,” Bockenheimer asserts. He notes that Airbus has been working with AISC-SHM and other industry groups for more than a decade to build a robust certification path.
“Aircraft engines have used condition monitoring systems for years,” says Andrew Chilcott, director, Structural Monitoring Systems (SMS, Nedlands, Australia; Century City, CA, US and Ashford, UK). Bockenheimer agrees, citing Built-In Test Equipment (BITE) in avionics and Health and Usage Monitoring Systems (HUMS) in helicopters as additional examples of this trend to integrate condition monitoring into the overall aircraft systems architecture. He adds, “SHM will become one more core element in this architecture, enabling manufacturers to design and qualify systems that will reduce the time and cost of scheduled and unscheduled maintenance and increase aircraft availability.”
Alternative aircraft inspection method
This is exactly the aim of the program at Delta Air Lines led by the AANC and its operator, Sandia Labs. “The program to achieve certification of SHM for routine use on commercial aircraft began several years ago,” says Sandia senior technical fellow, Dennis Roach. The application is an aluminum fitting in the Boeing 737NG aluminum center wingbox, for which an airworthiness directive had been issued, mandating visual and eddy-current inspection for crack detection at periodic intervals. “All aircraft are designed according to damage-tolerance principles,” says Roach. “The FAA and OEM directives are thus based on how long and what loads it takes to make cracks form and grow.” For the wingbox fittings, inspection is time-consuming, necessitating removal of seats and floor panels. Roach stresses that none of the normal maintenance is changed until the SHM method is certified: “Delta is doing both the traditional inspections as well as the SHM.”
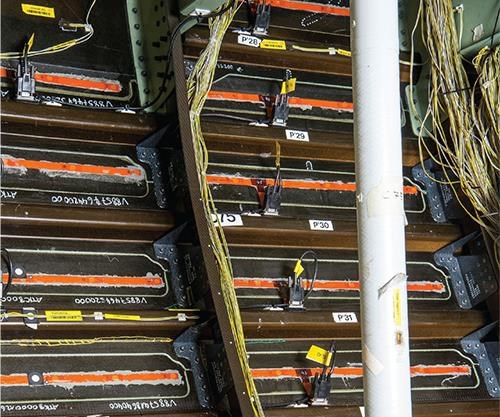
The ultimate goal is to have sensors mounted in place so that mechanics can plug in from a convenient location to acquire the required data without the time and cost of disassembly and manual inspection. This also reduces potential damage to structure during access and risk of human error during inspection. “We have seven aircraft flying with 10 sensors on each aircraft,” says Roach. The program is using SMS’ CVM sensors, shape-customized and adhered to wingbox fittings. These detect crack initiation and growth by monitoring the slightest pressure change between 0.64-mm channels or “galleries” laser etched into a Teflon pad.
Sensors are applied using a self-stick adhesive. Roach says some surface preparation is required to achieve a very tight seal, but on a fairly smooth surface that can be approached directly, “a single CVM sensor can be applied in 10-15 minutes.” Vacuum tubes are then routed to a testing socket and attached using snap-clip connectors like those used in landline telephones. During the mandated inspections, a handheld scanning unit is plugged into these testing sockets to interrogate the sensors and give a clear pass or fail indication.
According to Roach, system interrogation for the 737 aircraft is performed every three months, typically while the aircraft is at a terminal gate overnight. The aim is to work with Boeing through the latter part of 2015 to compile collected data and present it to the FAA. “We hope that Delta is able to use SHM as an alternative inspection technique in 2016,” says Roach.
This is just one part of a much larger SHM effort at Sandia, which includes testing of many other types of SHM systems as well as laboratory performance testing as a statistical basis for validation. Standardizing this validation process also is a key objective. “One of our tasks in this program at Delta is to see how well it fits vs. the ARP-6461 guidelines,” says Roach. “There must be some level of standardization in how SHM is integrated into the airline maintenance operations, including training of the maintenance personnel and cradle-to-grave issues, such as continued airworthiness of the SHM system.”
Paving the path for composites
Many in the industry hope the Delta program will serve as a blueprint for SHM implementation on other commercial aircraft. “Once you have one system approved, it should be easier to get another approved,” says Amrita Kumar, executive VP of business at Acellent Technologies Inc. (Sunnyvale, CA, US). “I am hoping we will get a composites SHM application approved within the next 2-3 years.”
SMS CEO Toby Chandler sees the Delta program as key in developing recognition of SHM as a commercial technology.
“We have clearly established that CVM is an effective tool, and regulatory bodies are close to allowing it as an inspection regime,” adds Trevor Lynch-Staunton, project manager at SMS’ manufacturing partner, Anodyne Electronics Manufacturing Corp. (AEM, Kelowna, BC, Canada).
“But this is just the tiniest tip of the iceberg,” says Chilcott, “particularly with composites, where the understanding of damage is still young and developing. This type of capability with composites will allow reducing weight in the doors and vertical tails, for example, because you will develop an understanding of where and how the damage initiates and its progression. We don’t have a good way to do that right now.”
Condition-based maintenance
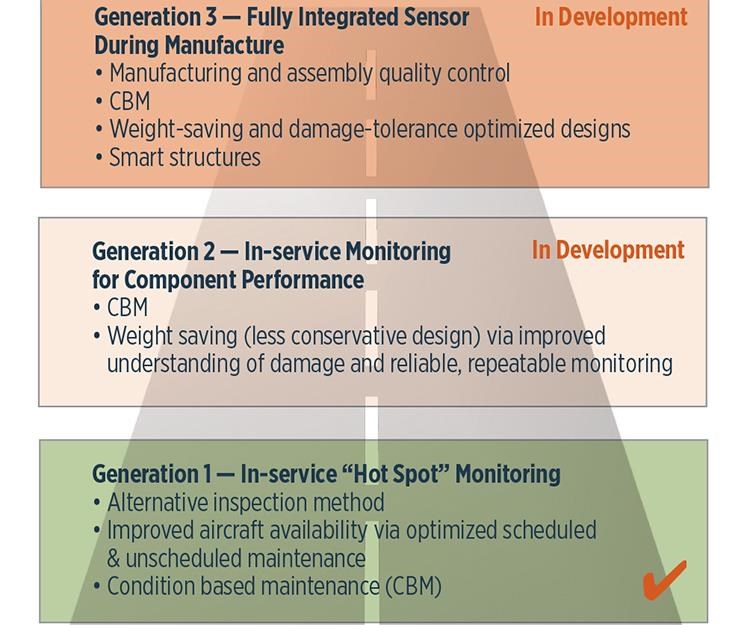
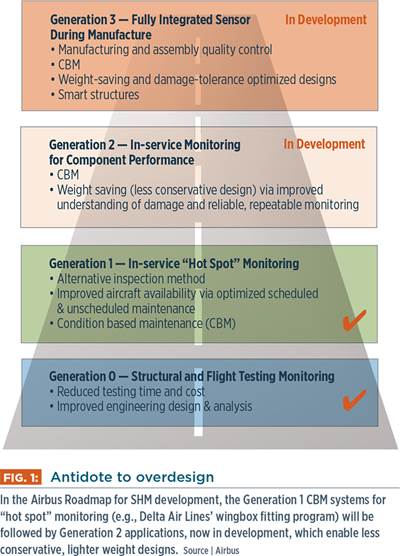
“With the growing number of older aircraft in service, the business case for SHM retrofit applications is gaining more and more momentum,” explains Bockenheimer in the article “Structural health monitoring: A real-time on-board ‘stethoscope’ for condition based maintenance,” published in the August 2014 issue of Airbus’ Flight Airworthiness Support Technology (FAST #54) magazine. “Such an application is typically Generation 1 and aimed at known structure hotspots,” he adds.
These hotspots are defined during an aircraft’s certification testing and with continuous monitoring following entry into service. They require periodic visual inspection supported by NDT (e.g., ultrasonics, eddy current). Inspection intervals are based on fixed in-service time or cycles and are prescribed for all aircraft of a given model. Very often, no damage is found, yet a huge amount of time must nevertheless be consumed dismantling and reassembling the aircraft to access and inspect these structures. Airbus has several programs in place to explore SHM implementation in composite structures with a view toward enabling condition-based maintenance (CBM) — triggering inspections based on actual health indications of each aircraft’s structures instead of fleet-wide fixed time periods. This is also one of the goals of the FAA’s programs via the AANC at Sandia.
One illustration is the acousto-ultrasonics (AU) system Airbus is developing to detect stringer disbond in composite structures surrounding the doors on its A350 XWB. Data show this region accounts for the majority of in-service fuselage damage on long-haul aircraft, with 15% of impacts sustained by doors, 22% amassed in cargo door surrounds and 31% accumulated in passenger door surrounds. Current CFRP fuselage areas have been designed and tested to sustain such impact damage, but any visible damage still must be inspected using NDT. Using SHM sensors would alleviate concern about impacts that don’t produce visible damage, as well as do away with the need to inspect from inside the aircraft structure, which can involve time-consuming removal of interior sidewalls and other systems, resulting in lost flight revenue, especially when unscheduled. “Airlines estimate that $150,000 to $200,000 in revenue is lost for every day a narrowbody aircraft is not in service,” says Chandler, “and $500,000 per day is lost for widebody aircraft.”
The AU system now in testing uses a specially designed network of Acellent Technologies’ SMART Layer sensors — polyimide films in which piezoelectric sensors are strategically distributed to communicate with each other by sending and receiving ultrasonic surface waves (Lamb waves). These provide damage assessment based on software analysis of the signal disruptions and changes in patterns vs. baseline data. Sensors are easily installed using aerospace-grade adhesives. When a handheld SCAN Genie diagnostic unit is plugged into SMART Layer sockets, it can indicate the damage location and size or simply display a red/green signal to indicate damage/no damage in the structure. The system also can be designed to connect to onboard diagnostic units for on-demand or automated interrogation.
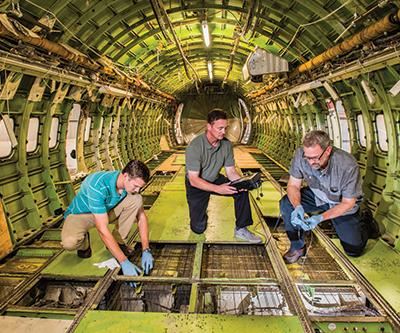
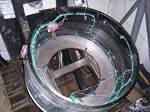
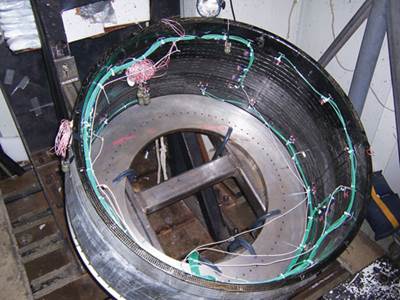
Airbus has two flight validators: an A350 and the MSN001 A340 flight-test aircraft retrofitted with an A350 XWB CFRP skin panel in the surround structure of passenger door 1 (see Fig. 2, at left). Instrumented with SMART Layer sensors, this area surrounding the door also is being tested in two ground validators: an A350 barrel section and a fuselage shell section that has been impacted extensively and inspected with manual NDT (e.g., conventional ultrasound) inside vs. outside to verify the system’s damage detection and assessment performance.
Advancing CBM to save weight
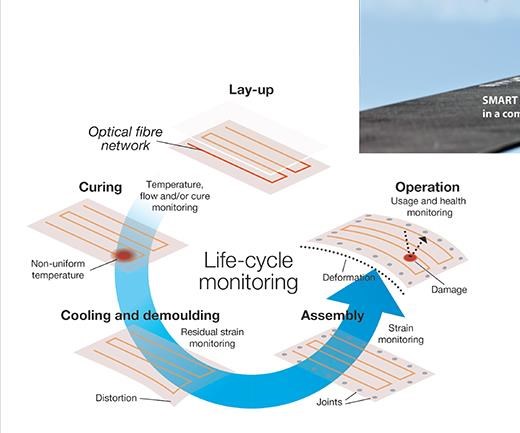
The next step beyond CBM (Generation 2 in Fig. 1, at left) is to use data collected from these applications to enable a less conservative, lighter weight design for structures in future aircraft.
Bockenheimer cites Airbus’ Vertical Tail Plane Next Generation (VTP-NG) rib de-bonding detection system as an example. The VTP-NG program, which has been advanced by the Composite Technology Center (CTC, Stade, Germany), proposes a novel design and manufacturing approach for the vertical tail, based on composite ribs bonded onto cored sandwich skins. However, to determine if rib debonding has occurred in service via conventional NDT, the structure must be opened to access the interior.
“This makes the structure too difficult to inspect, so a bonded solution would be difficult to realize,” explains Bockenheimer. “We proposed using CVM to detect rib debonding at any time we want, without having to access the inside. So now, we can work out the design for improved weight and decreased production costs.”
Although it offers much promise, the VTP-NG program is still in development.
Straightening the path to qualification
But what is actually required for such promising SHM applications to reach commercial service, and how long will it take? “Until now, the path for qualification and certification has not been very well defined or straight,” observes TESTIA’s Speckmann, “and SHM technology companies have spent a lot of money and time.” He adds that the framework being developed for Airbus’ SHM V&V Center emerged out of its A350 SHM door-surround program, with the goal to provide SHM technology companies with a clear way to get onto commercial aircraft without going bankrupt.
“It’s not in Airbus’ interest for these companies to waste time and money,” says Speckmann. It is planned that the V&V Center will become part of the Center for Eco-efficient Materials & Technologies (ECOMAT, Bremen, Germany), a locally funded science and industry research collaborative focused on new technologies in lightweight, multifunctional construction for not only aerospace but also automotive, wind energy, marine and building and construction applications.
Bockenheimer explains that Airbus MP&T is responsible for the development and qualification of SHM technologies. “We have formed multidisciplinary teams to integrate the structural sensing technology with the aircraft monitoring system architecture.”
This approach also has led Airbus to establish a comprehensive set of key requirements based on the type of SHM detection. Airbus has developed what it terms an “SHM Toolbox” of at least 14 pre-developed technologies for generic applications. “We then work with developers and operators to mature these tools for specific applications on an aircraft,” says Bockenheimer.
“Not all of the technologies are ready to be implemented,” Speckmann concedes, “but some should reach technology readiness within the next 5 years.” He cautions that for a technology to be used in commercial service, the technology readiness level (TRL) “is for a specific SHM tool coupled with a specific aircraft application.” When an SHM technology is applied to a different component or vice versa, the TRL must be reassessed. He also warns that companies will say their technology has reached TRL 7 — indicating it has flown on an aircraft — without having yet completed all of the testing required for TRL 4, TRL 5 and TRL 6.
Speckmann reports that there are five to seven different technologies in Airbus’ SHM Toolbox that apply to composites, and it should be possible to move them from TRL 3 to TRL 6 within 2-5 years, depending on the type of application. “This will go faster if you have the money to do a lot of tests concurrently,” he suggests, adding that time for testing also will decrease with computer modelling and simulation — like that now used to improve and automate NDT.
Through the envisaged SHM V&V Center, Airbus MP&T will define the maturation required for a given SHM technology and application. Then, TESTIA will work with the V&V Center, subcontracted in a way, to present SHM maturation and testing requirements to the technology companies, system integrators and OEM, organize the testing program and then help to perform these tests. Today, TESTIA is providing NDT services and training NDT personnel for a wide range of OEMs, airline operators and parts manufacturers.
“SHM will automate NDT on the aircraft,” notes Speckmann, “so we will be installing the systems when the SHM solution has been accepted by the individual Airbus aircraft programs.” Established in 2013 to support SHM implementation, TESTIA also will develop installation procedures and train installation personnel.
Finally, smart structures
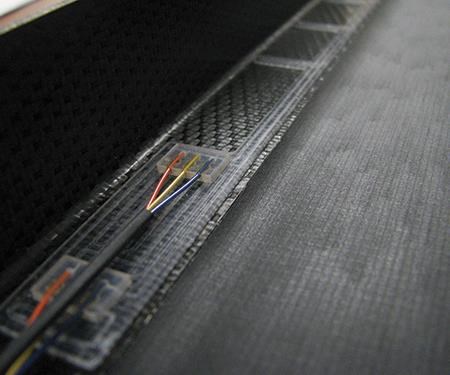
The ultimate benefits of SHM are anticipated when sensors can be incorporated during manufacture to achieve the long-envisioned smart structures (see Fig. 3, at left). “Our SMART Layer materials were developed to be co-cured into a composite structure,” says Acellent’s Kumar. She notes that Acellent’s SHM system is now capable of performing all four of the necessary functions required for oversight of composite structures:
- Damage detection (is there damage?)
- Localization (where is the damage?)
- Quantification (how much damage?)
- Characterization (what type of damage? —
- delamination, honeycomb damage, fiber breakage, etc.)
At SMS, much of its early SHM development work also was in composites. As an alternative to embedding sensor pads, SMS learned the composite itself can be molded or laser-machined to form the sensor galleries and then covered with a thin Teflon manifold. Chilcott recalls, “We did a lot of testing to make sure integration of the CVM sensors did not affect the composites’ properties. The results were so positive, it generated a great deal of interest in our technology.”
Also capable of reading strain, CVM sensors reportedly can detect a 0.00254 mm crack. “They are easily integrated into a CFRP stringer or door and detect when there is a disbond or delamination.”
Airbus also is developing small-diameter (50-125 μm) fiber-optic sensors that can be embedded into CFRP structures during manufacture. They reportedly can measure temperature and stress fields during cure, residual stress build-up during assembly, and in the final structures, they can monitor impact damage and structural loads, helping to further weight-optimize designs.
Bockenheimer cites SHM as a key to achieving the best aircraft operability and revolutionary structural design, but acknowledges much work remains. “Many subsequent tests are required to prove durability,” he says. “We want to define new tests which combine chemical, temperature and mechanical loadings, for example, to reduce cost and time.”
Speckmann notes the formation of an OEM group within the SHM-AISC at its most recent meeting in April, which will initially include Boeing, Airbus, Sikorsky (Stratford, CT, US), Bombardier and Embraer (São José dos Campos, Brazil). It will begin identifying ways to work cooperatively on maturation of systems for commercial aircraft.
“We are already doing this independently,” says Speckmann, “but there is too much work to be done yet for it to be duplicated.” The ultimate goal, he says, “is to speed up maturation of SHM technology worldwide, so that all OEMs and operators can start to take advantage of its benefits.”
Related Content
Xnovo Technology, Exciscope introduce X-ray tensor tomography technique
Through a strategic partnership, the companies introduce the FiberScanner3D module, dedicated to bringing more rapid, reliable and robust fiber structure characterization methods to lab settings.
Read MoreVIDEO: AI, cameras and lasers for FOD detection
Virtek Vision demonstrates its Iris AI technology at CAMX 2024. It combines laser projection with machine learning software to detect foreign object debris during a composite layup.
Read MoreRobotic NDT inspection solutions, services enhance multitasking capabilities
CAMX 2024: Matec Instrument Companies Inc. presents its range of nondestructive ultrasonic testing technologies, including robotic inspection systems for increased efficiency and reduced physical strain.
Read MoreNondestructive inspection methods available to composites manufacturers
An overview of composite laminate inspection techniques ranging from manual testing methods to more advanced, noncontact options.
Read MoreRead Next
Structural health monitoring: The toolbox
There are a broad range of SHM technologies that take advantage of a variety of sensing mechanisms. Here's a short sketch of each, accompanied by tables that indicate current uses and developmental progress.
Read MoreStructural health monitoring: Composites get smart
New initiatives are mainstreaming real-time monitoring systems into composites on aircraft, wind blades and other critical performance structures.
Read MoreStructural health monitoring: Decades of demos build confidence
Current momentum in local structural health monitoring development can be credited to a great deal of developmental effort on the part of these system developers.
Read More

