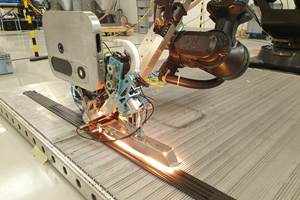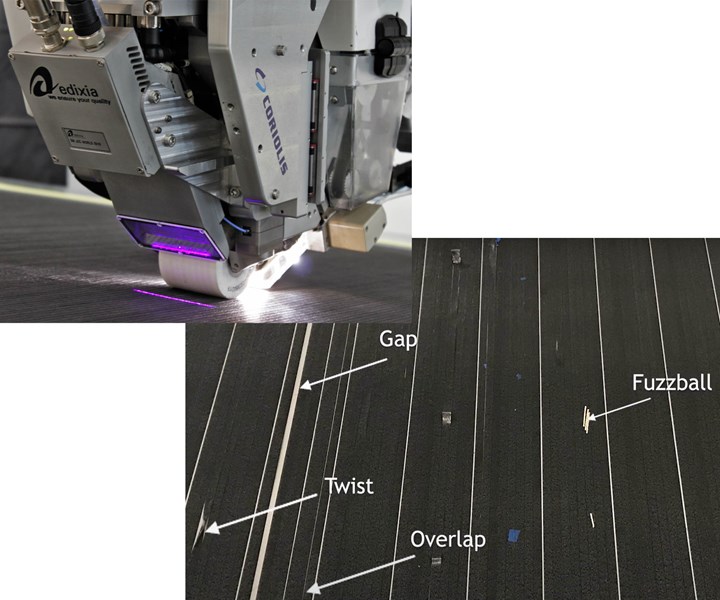
Automated fiber placement (AFP) specialist Coriolis Composites (Quéven, France) has demonstrated inline inspection developed in partnership with Edixia (Vern-sur-Seiche, France), which supplies automated inspection and industrial vision technologies. The sensor built by Edixia is integrated into the placement head of Coriolis Composites’ AFP machines. “This solution detects all of the standard defects, including gaps, overlaps, twisted tows and fuzzballs,” says Godefroy Marechal, R&D project manager at Coriolis Composites. “It should allow for 100% inspection during continuous production of complex-shaped parts and can increase productivity by 20-30% compared to current methods. This system is easy to configure and can be used on a wide variety of composite materials, including carbon fiber-reinforced thermosets, thermoplastic and even ceramic materials.”
Development of the sensor
Marechal explains that Coriolis Composites has wanted to implement inline inspection for some time. “We understood that our customers want this solution and that all AFP must have integrated inspection for the future,” he says. “When Coriolis started working with automated inspection three to four years ago, we thought we’d find a plug-and-play system off the shelf, but then realized it doesn’t exist yet. Edixia is a good partner because it has more than 35 years of experience in vision systems and surface inspection. We had worked with Edixia some years ago to use one of their vision systems in the automated calibration of our AFP robot. So now we have combined the expertise of the two companies to develop an efficient, but robust solution.”
The sensor is based on Edixia’s AF-Inspect technology and comprises a line laser and a camera watching the line shape. “It works like a profilometer,” says Marechal. (For more on profilometers, see “Automated, in-situ inspection a necessity for next-gen aerospace”). “From that shape, it generates a point cloud of data.”
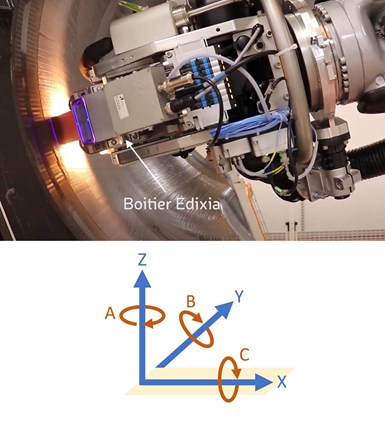
The image above shows the boitier (housing) for the Edixia sensor as well as its purple laser line which scans the surface of the AFP laminate for defects. Connected to the AFP head’s external encoder, the sensor knows its position in 6-axes of 3D space. Source | Coriolis Composites
But before that data can be analyzed, the point cloud must first be oriented to the 3D reference system of the Coriolis Composites AFP head. “The Edixia sensor is connected to our external encoder on the head to get its 6D position (x,y,z,A,B,C) in real time, via our algorithm.” This is analogous to how CNC machines are programmed, with 6 axes of freedom being X and Y in the plane and Z-direction out of the plane, with A, B and C being the degree of rotation about each of these axes. The data is then analyzed by a combination of Edixia and Coriolis Composites software, which identifies defects in real time based on a combination of algorithms.
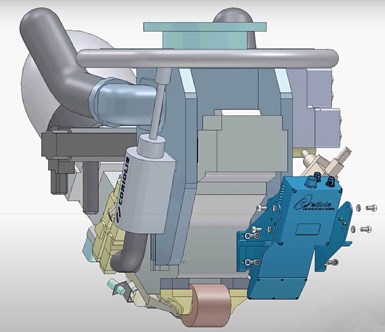
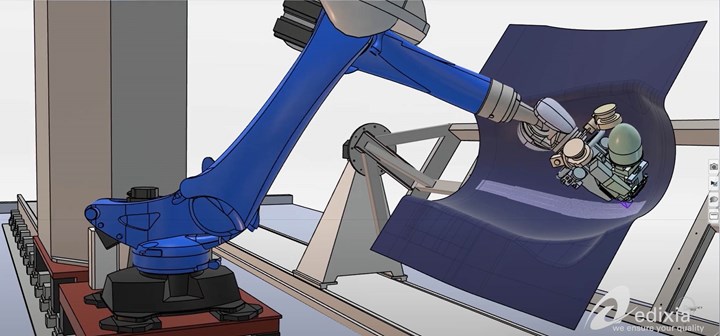
The Edixia sensor is easy to attach to the Coriolis Composites AFP head without unmounting it from its robotic arm. Source | Coriolis Composites
“It is physically easy to add the sensor,” says Marechal, “you simply attach it with fasteners and you don’t have to unmount the AFP head to add it.” The communication in the software is where the challenge lies and continues to be developed. “We’re working to make this solution seamless to our customers,” he adds.
Coriolis Composites has also worked with Edixia to integrate the inline inspection sensor with minimal change to the shape and volume of the AFP head. “Coriolis Composites AFP heads are compact, which helps when customers want to produce not just flat panels, but complex, 3D shapes,” says Marechal. “This small head helps to avoid collisions with flanges and corners. For parts like spars, this guarantees the quality of the fiber placement in the corner areas.”
However, inspection in these areas is a key issue. “You have very small areas in corners where, currently, you cannot inspect,” Marechal points out. “We’ve thought about how to use the Edixia sensor with additional, inspection-only robot paths, to be able to inspect 100 percent of such parts. It’s difficult to get the right sensor and the right algorithms, the right system as a whole, to do complex 3D parts. But this is exactly what we are offering. That’s the point I try to make in the video: we can do 2D inspection on a flat panel and 3D inspection on spars and parts with complex shapes and corners. Customers can come to our R&D facility and we can do trials on specific parts to prove we can provide 100 percent inspection.”
Development of the software
Once the sensor and AFP head have enabled 100 percent inspection of the part, the next step is to identify the defects. “This is the software’s job, to get back the data and identify what the defects are, where they are located and what the impact will be for the whole part. That is what we are refining now.”
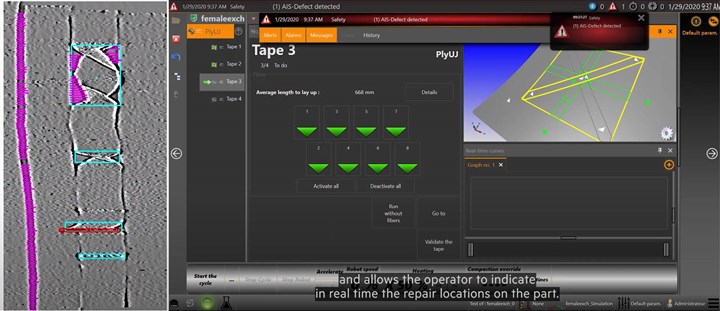
In the screen shots below, the Edixia sensor output can be see at left. “This type of image is shown after each tape is laid,” says Marechal. “Pink indicates gaps. For example, the long pink line at left shows a gap between two tapes. The blue boxes show a defect in the Z-direction, and in that tow, you can see a twist and fibers that are not straight.”
The Coriolis Composites human machine interface (HMI) is shown on the right. “The Edixia sensor is integrated into our AFP machine and then communicates to our HMI, allowing the operator to indicate in real time the repair locations on the part,” Marechal explains. “This is the work we are doing this year, refining that communication between the Edixia sensor and our software. We have developed the interface between the two and are now doing trials to validate this as well as the algorithms that enable the software to identify and annotate each defect. We have partnerships with our customers to complete this validation over the next months.”
Screenshot of Edixia sensor software (left) and Coriolis Composites human machine interface (HMI, right). Source | Coriolis Composites
What about the ability of the sensor to show where the defects are located? “This is not an issue,” says Marechal. “We already developed the ability to communicate with a laser projector, working with LPT (Laser Projection Technologies, Londonderry, N.H.) in the U.S. But then they were acquired by FARO Technologies (Lake Mary, Fla., U.S.), which has changed all of their software. So, now I will have to redevelop this, but it is straightforward.”
He continues, “We have tried to work with other laser projection systems, however, and aren’t tied to one supplier. It’s just a matter of performance versus price and what our customers want.” What about integrating with virtual reality (VR) for 3D visualization of defects? “For now, this is not something customers have emphasized, but we can help provide this capability for them in the future, if needed.”
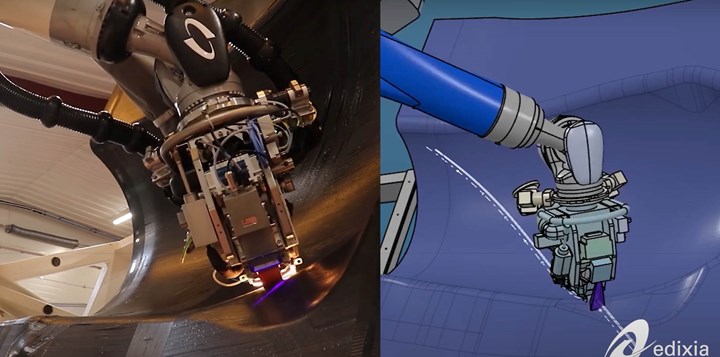
The path of the Edixia sensor can be seen as the purple laser line (left) and in the simulation (right) as a purple trapezoid. Source | Coriolis Composites
Optimizing the process
Another key focus for Coriolis Composites is the ability to use this defect data to optimize the AFP process within its in-house digital chain. “This is something we want to tell our customers: we have developed our own in-house software and fully manage our own digital process chain, fully anticipating continuous development in inspection strategies,” Marechal explains. “This is part of what I’m referring to when I discuss in the video our offline programming software.”
I discussed this in the 2018 feature article, “Consolidating thermoplastic aerostructures in place, Part 1”:
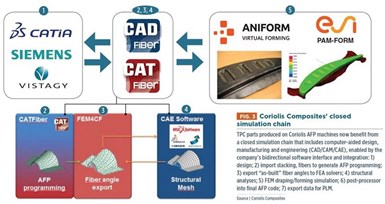
“… parts produced on Coriolis machines now benefit from what thecompany calls a ‘closed simulation chain,’ which integrates computer aided design, manufacturing and engineering (CAD-CAM-CAE) enabled by the company’s bidirectional software interface and integration. “The part begins with design by the OEM in CATIA [Dassault Systèmes],” says (Coriolis CTO Alexandre) Hamlyn. “Our CAT/CADFiber software imports the composite stacking from CATIA and gives the user the tools needed to model all of the fibers. It then generates and optimizes the AFP tape/tow courses.”
After a test part is produced for validation, the software then exports true “as-built” fiber angles to commercial FEA solvers (e.g., NASTRAN, ABAQUS, SAMCEF) and enables mesh mapping between the AFP surface and the structural FEM mesh.”
“We use a standard Siemens controller,” concedes Marechal, “but our software is key to using our AFP machines with complex 3D parts. Our command of the digital process chain makes the composite parts production more reliable by guaranteeing traceability, but now even further optimization. For example, if a defect keeps occurring, the software will show this and can help to redesign the part and/or manufacturing to alleviate this.”
Size, speed and commercial availability
Currently, the system is able to provide non-contact detection and location of defects larger than 0.5 millimeter. However, Marechal notes, “Every customer doesn’t have the same tolerances, so there is not one definition that will work for all. Each customer will need to tailor this. Also, customers will have to change tolerances within different parts.” He also points out that inline inspection will catch more defects than human inspectors, “so there will have to be some adaptation versus what current tolerances are in order to maintain production yields. This is also something we are working on with our customers.”
Though Edixia lists a top inspection speed of up to 2 meters/second, Marechal says that has not yet been tested. So, is it possible to run at full AFP speed and still collect 100 percent of the defect data? “Yes,” says Marechal, “but the AFP speed depends on what material you use. Some materials are harder to place, so you run slower. The inspection speed will also depend on the resolution you require. Currently, we can run at 1 meter/second and we have asked Edixia to enable the sensor to run at 1.5 meters/second. We have ideas to further improve accuracy and speed.” Coriolis Composites is targeting having commercial machines equipped with inline inspection by 2021.
Related Content
Heat mapping simulation to improve AFP parts
An optical model developed for Coriolis Composites’ SimuReal AFP process simulation software enables verification of energy distributions during AFP to better define heating laws.
Read MorePlant tour: Aernnova Composites, Toledo and Illescas, Spain
RTM and ATL/AFP high-rate production sites feature this composites and engineering leader’s continued push for excellence and innovation for future airframes.
Read MorePlant tour: Joby Aviation, Marina, Calif., U.S.
As the advanced air mobility market begins to take shape, market leader Joby Aviation works to industrialize composites manufacturing for its first-generation, composites-intensive, all-electric air taxi.
Read MoreATLAM combines composite tape laying, large-scale thermoplastic 3D printing in one printhead
CEAD, GKN Aerospace Deutschland and TU Munich enable additive manufacturing of large composite tools and parts with low CTE and high mechanical properties.
Read MoreRead Next
Developing bonded composite repair for ships, offshore units
Bureau Veritas and industry partners issue guidelines and pave the way for certification via StrengthBond Offshore project.
Read MoreAll-recycled, needle-punched nonwoven CFRP slashes carbon footprint of Formula 2 seat
Dallara and Tenowo collaborate to produce a race-ready Formula 2 seat using recycled carbon fiber, reducing CO2 emissions by 97.5% compared to virgin materials.
Read MoreVIDEO: High-volume processing for fiberglass components
Cannon Ergos, a company specializing in high-ton presses and equipment for composites fabrication and plastics processing, displayed automotive and industrial components at CAMX 2024.
Read More


